Installation and configuration#
Run the corresponding nJAMS Client for BW6 installer depending on your operating system:
For Unix/Linux platforms:
nJAMSClientForBW6_unix_<version>.sh
For Windows:
nJAMSClientForBW6_windows-x64_<version>.exe
The following procedure shows by way of example an interactive installation on a Windows machine:
Start the installer executable
nJAMSClientForBW6_windows-x64_<version>.exe.Click
Nexton Welcome dialog: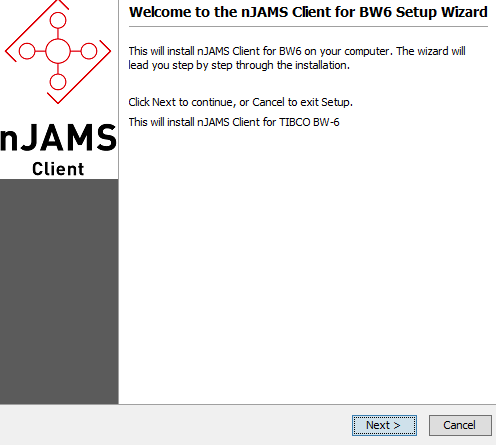
Select your TIBCO_HOME directory either by selecting variable or by manually selecting TIBCO BusinessWorks 6 installation folder. Optionally you can backup existing config files from a previous installation of nJAMS Client for BW6. Make sure you have sufficient privileges to access this directory. Click on
Nextto proceed: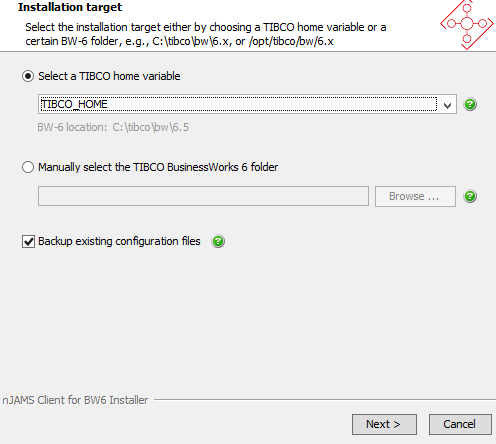
Specify installation type:
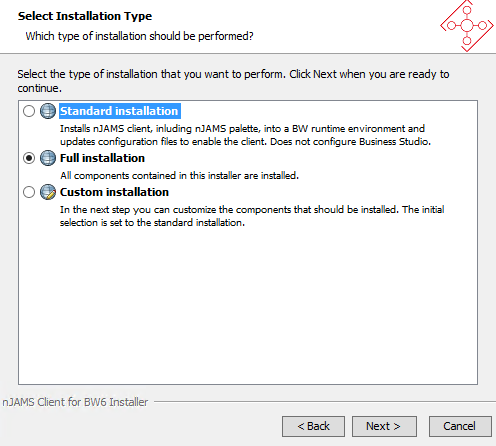
- Standard installation:
Installs all components that are pre-selected in “custom installation” (see below)
- Full installation:
Full installation additionally allows to update your TIIBCO Business Studio workspaces.
- Custom installation:
Specify components to install separately:
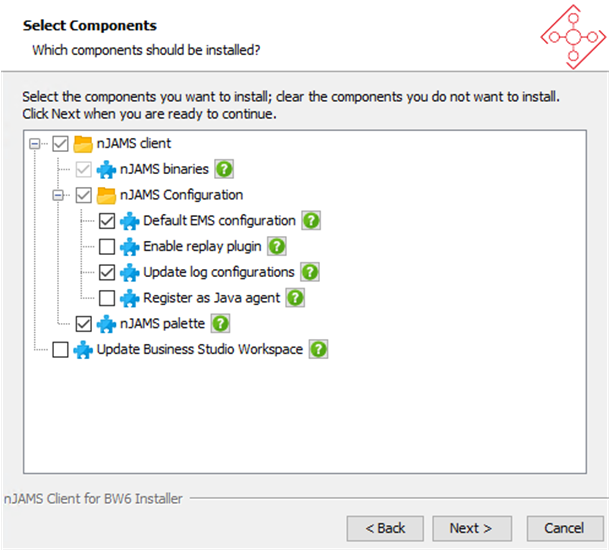
- nJAMS binaries:
Essential component for runtme and designtime. This option is madatory.
- Default EMS configuration:
Creates a default JMS connection for TIBCO EMS. The default configuration is stored by default in
<TIBCO_HOME>/bw/<VERSION>/config/njams/njams.properties. This file contains the default configuration of nJAMS Client for BW6. It is recommended to enter a default JMS connection during installation. However, it is not required. You can enter a JMS connection afterwards by editingnjams.properties.- Enable replay plugin:
Select this option, if you want to use nJAMS Replay with nJAMS Client for BW6. nJAMS Replay requires a separate license.
- Update log configuration:
Select this option, if you want the installer to update all appnodes on this machine in order to enable logging of nJAMS Client for BW6 for all appnodes. It is recommended to enable this option.
- Register as Java Agent:
This option registers nJAMS Client for BW6 as Java agent in the TIBCO BusinessWorks 6 runtime environment.
Note
There are only rare cases, when registering the client as Java agent is indicated. You only need to register nJAMS as Java agent, if you are also using other third party monitoring-, profiling-, or debugging-software that registers itself as a Java agent. Commonly this option is not required.
The Java agent setting references nJAMS Client for BW6 JAR file from the bwappnode.tra file(s). When updating nJAMS manually by just replacing the JAR file, you also need to adapt the agent setting in the tra files to match the new client file name (version) by adding option
-javaagent:C:/TIBCO/bw/6.6/system/shared/com.faizsiegeln.njams.bw6-<VERSION>@2.jarto propertyjava.extended.propertiesinbwappnode.tra.For example:
java.extended.properties=-Xmx1024m -Xms128m -XX:+HeapDumpOnOutOfMemoryError
-javaagent:C:/TIBCO/bw/6.6/system/shared/com.faizsiegeln.njams.bw6-4.3.0@2.jar
-Dnjams.bw6.config=C:/TIBCO/bw/6.6/config/njams/njams.properties
Warning
The BW environment will fail to start, if the file referenced as Java agent does not exist.
- nJAMS palette:
Select this option, if you want to use nJAMS log activities in your BW6 processes. This option installs nJAMS palette in TIBCO BusinessWorks 6 runtime environment.
If nJAMS palette should also be available in TIBCO Business Studio, nJAMS palette has to be installed manually in TIBCO Business Studio. Starting with version 4.3.1 of nJAMS Client for BW6 the nJAMS installer no longer installs nJAMS palette in TIBCO Business Studio. Please use the standard procedure provided by TIBCO for software installation within TIBCO Business Studio (Eclipse).
If you do not want to use nJAMS palette and just use nJAMS in non-invasive mode, you can omit this option.
- Update TIBCO Business Studio Workspace:
Select this option, if you want to enable nJAMS Client for BW6 in TIBCO Business Studio. This option is recommended, if you want to use nJAMS Client for BW6 in designtime. This option allows you to test your processes in TIBCO Business Studio and see the results in nJAMS GUI.
If you have multiple workspaces, you can enable nJAMS Client for BW6 in all of them one after another.
Specify TIBCO EMS default configuration. Click
Nextto proceed: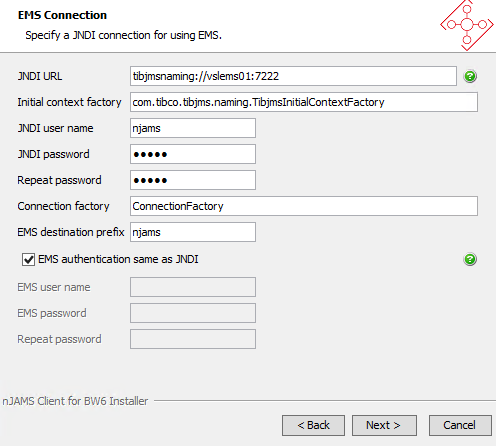
- JNDI URL:
Enter JNDI connection string. You can also enter fault tolerant connections, e.g.
tibjmsnaming:://vslems01:7222,tibjmsnaming:://vslems02:7222.- Initial context factory:
Typically the JNDI context factory for TIBCO EMS is
com.tibco.tibjms.naming.TibjmsInitialContextFactory.- JNDI user name:
Name of JNDI user.
- JNDI password:
Password of JNDI user.
- Connection factory:
Enter your connection factory here.
- EMS destination prefix:
Enter your preferred prefix of destinations used by nJAMS Client for BW6. Make sure the destinations match the configuration of your nJAMS instance.
- EMS authentication same as JNDI:
Select this option, if JNDI credentials are same as for EMS authentication. Otherwise, enter individual username/password for EMS authentication.
Update appnodes. Enable nJAMS Client for BW6 for all appnodes available in the specified directory and enter log level of nJAMS Client for BW6. Click
Nextto continue: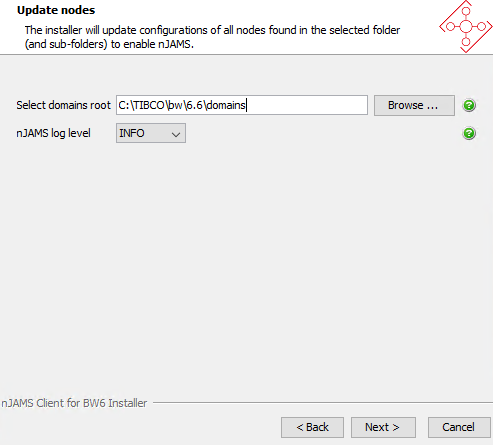
The summary shows the selected options. Click
Nextto continue: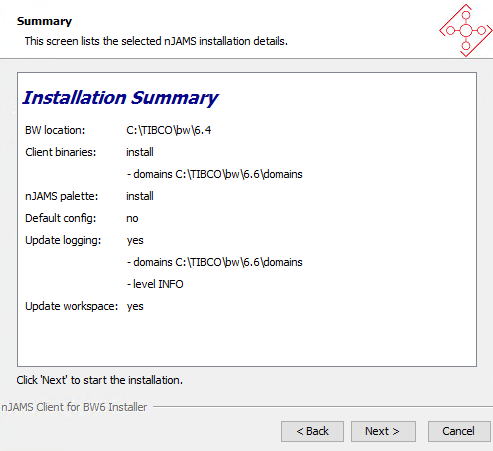
Add nJAMS Client for BW6 to TIBCO Business Studio:
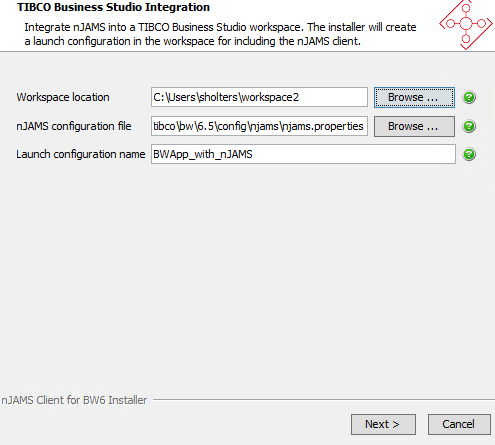
The installer adds nJAMS Client for BW6 to TIBCO Business Studio and creates a launch configuration for the specified workspace.
- Workspace location:
Enter directory to your workspace of TIBCO Business Studio.
- nJAMS configuration file:
Confirm the default configuration file, or specify a different configuration file.
- Launch configuration name:
Confirm the default launch configuration name, or enter a different name.
Click
Nextto continue. The installer will update the workspace. If you have multiple workspaces, you are asked for another workspace you want to update. Click ‘Yes’ to enable nJAMS Client for BW6 for another workspace. Click ‘No’, when you are done.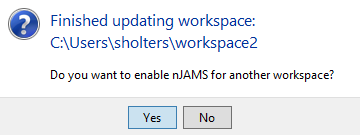
Finish installtion, close nJAMS Client for BW6 installer:
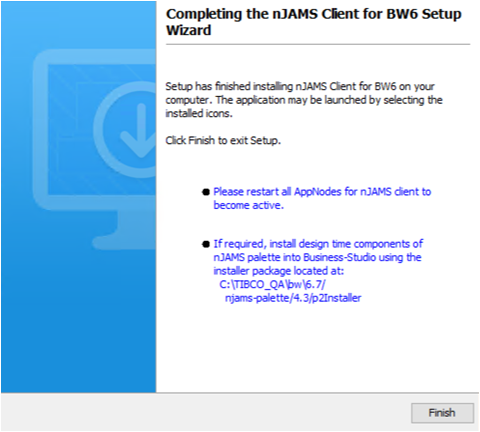
Optionally you can now install nJAMS palette in TIBCO Business Studio. Please follow the instructions in chapter Install nJAMS palette in TIBCO Business Studio.
Restart appnodes and bwagents.
Verify the banner text information to make sure that nJAMS Client for BW6 has been started successfully:
com.im.njams.sdk.Njams - ************************************************************
com.im.njams.sdk.Njams - ***      nJAMS SDK: Copyright (c) 2021 Faiz & Siegeln Software GmbH
com.im.njams.sdk.Njams - ***
com.im.njams.sdk.Njams - ***      Version Info:
com.im.njams.sdk.Njams - ***      scmBranch: origin/master
com.im.njams.sdk.Njams - ***      cloudCommunicationVersion: 4.1
com.im.njams.sdk.Njams - ***      scmCommit: 08d4feef9f06bdad917f6a46daaa794b29cc2fae
com.im.njams.sdk.Njams - ***      sdkVersion: 4.1
com.im.njams.sdk.Njams - ***      clientVersion: 4.3
com.im.njams.sdk.Njams - ***
com.im.njams.sdk.Njams - ***      Settings:
com.im.njams.sdk.settings.Settings - ***      njams.sdk.communication = CLOUD
com.im.njams.sdk.settings.Settings - ***      njams.sdk.communication.cloud.apikey = C:/TIBCO/njams/client/bw6/bjosyuh/api.key
com.im.njams.sdk.settings.Settings - ***      njams.sdk.communication.cloud.endpoint = ingest.test.njams.cloud
com.im.njams.sdk.settings.Settings - ***      njams.sdk.configuration.file.file = C:\TIBCO\bw\6.5\config\njams\BWEclipseDomain_BWEclipseAppSpace_BWEclipseAppNode_Nested_DynSpawnSubProcesses.application.json
com.im.njams.sdk.settings.Settings - ***      njams.sdk.communication.cloud.client.instanceId = bjosyuh
com.im.njams.sdk.settings.Settings - ***      njams.sdk.communication.cloud.client.privatekey = C:/TIBCO/njams/client/bw6/bjosyuh/8fc4b2ea16-private.pem.key
com.im.njams.sdk.settings.Settings - ***      njams.bw6.replayEnabled = false
com.im.njams.sdk.settings.Settings - ***      njams.bw6.config = C:/TIBCO/bw/6.5/config/njams/njams.properties
com.im.njams.sdk.settings.Settings - ***      njams.sdk.configuration.provider = file
com.im.njams.sdk.settings.Settings - ***      njams.sdk.communication.cloud.client.certificate = C:/TIBCO/njams/client/bw6/bjosyuh/8fc4b2ea16-certificate.pem
com.im.njams.sdk.Njams - ************************************************************
com.faizsiegeln.njams.bw6.ClientInstance - Replay functionality is disbled by configuration.
com.im.njams.sdk.communication.CommunicationFactory - Create Receiver CLOUD
com.im.njams.sdk.communication.cloud.CloudTopic - Creating KeyStorePasswordPair from C:/TIBCO/njams/client/bw6/bjosyuh/8fc4b2ea16-certificate.pem and C:/TIBCO/njams/client/bw6/bjosyuh/8fc4b2ea16-private.pem.key
Installing nJAMS Client for BW6 in “Console mode”#
On Unix/Linux systems you can either run installer in GUI mode or console mode. To run the installer in console mode follow these steps:
Extract the content of the package to a temporary directory
Inside console window navigate to temporary directory
Execute
nJAMSClientForBW6_unix_<version>.sh -consoleRespond to the console window prompts step by step.
Installing nJAMS Client for BW6 in “Unattended mode”#
The unattended mode of the installer allows to run the installation automatically by using pre-defined settings.
An unattended installation has to refer to a response var file that includes pre-defined installation settings.
It is recommended to use a response var file from an attended installation as a template and adapt the settings in this file accordingly.
A response var file is generated obligatory and resides in <installationfolder>/.install4j/.
Run installer in Unattended Mode as follows:
nJAMSClientForBW6_unix_<version>.sh -console -q -varfile response.varfile
Please find below a sample response.varfile that can be adapted according to your requirements:
# install4j response file for nJAMS Client for BW6 4.3
connectionFactory=ConnectionFactory
dirDomains=/opt/tibco/bw/6.6/domains
doBackup$Boolean=false
emsDestination=queue.njams
emsPwd.encoded=
emsUser=njams
jndiContextFactory=com.tibco.tibjms.naming.TibjmsInitialContextFactory
jndiPwd.encoded=kZWekow\=
jndiUrl=tibjmsnaming\://vslems01\:7222
jndiUser=njams
logLevelSelectIndex$Integer=0
radioSelect=dir
repeatJndiPwd.encoded=kZWekow\=
repeatPwd.encoded=
sameAuth$Boolean=true
selectedIndex$Integer=-1
sys.adminRights$Boolean=false
sys.component.client$Boolean=true
sys.component.defaultConfig$Boolean=true
sys.component.logging$Boolean=true
sys.component.palette$Boolean=true
sys.component.replayEnabled$Boolean=false
sys.component.studio$Boolean=false
sys.installationDir=/opt/tibco/bw/6.6
sys.installationTypeId=1092
sys.languageId=en
tgtDir=/opt/tibco/bw/6.6
tibcoHome=/opt/tibco
tra.njams.config=\ -Dnjams.bw6.config\="/opt/tibco/bw/6.6/config/njams/njams.properties"
tra.weaver=\ -javaagent\="/opt/tibco/bw/6.6/system/lib/aspectjweaver.jar"