Installation and configuration using Connector#
Installation#
nJAMS Client for Mule4 is installed by editing pom.xml manually.
Start Anypoint Studio and open your Mule project
Edit file
pom.xmlof your Mule project: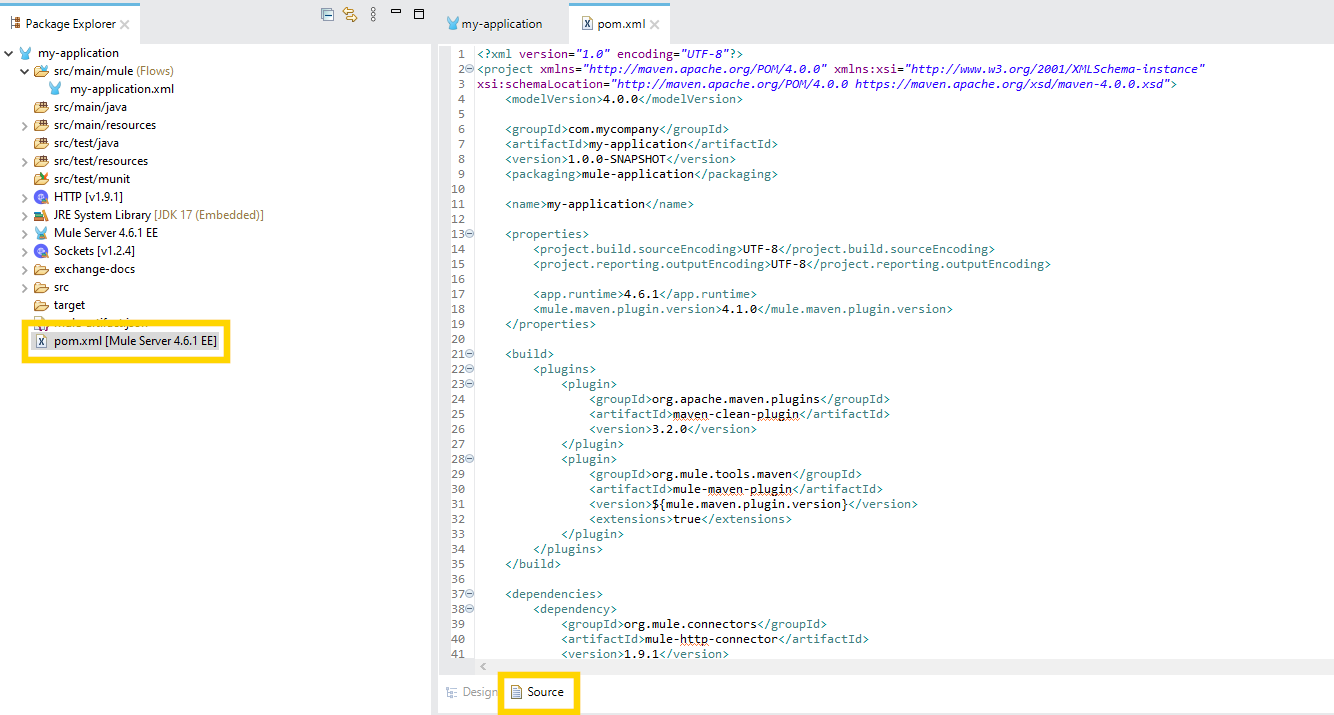
2.1 Add the following content into build/plugins/plugin org.mule.tools.maven:
<configuration>
    <sharedLibraries>
        <sharedLibrary>
            <groupId>com.faizsiegeln.njams</groupId>
            <artifactId>njams-client-mule4</artifactId>
        </sharedLibrary>
    </sharedLibraries>
</configuration>
The whole <build> section would then be as follows:
<build>
    <plugins>
        <plugin>
            <groupId>org.apache.maven.plugins</groupId>
            <artifactId>maven-clean-plugin</artifactId>
            <version>3.2.0</version>
        </plugin>
        <plugin>
            <groupId>org.mule.tools.maven</groupId>
            <artifactId>mule-maven-plugin</artifactId>
            <version>${mule.maven.plugin.version}</version>
            <extensions>true</extensions>
            <configuration>
                <sharedLibraries>
                    <sharedLibrary>
                        <groupId>com.faizsiegeln.njams</groupId>
                        <artifactId>njams-client-mule4</artifactId>
                    </sharedLibrary>
                </sharedLibraries>
            </configuration>
        </plugin>
    </plugins>
</build>
2.2 Add the following content into section <repositories>:
<repository>
    <id>integrationmatters-repo-release</id>
    <url>https://maven.integrationmatters.com/release</url>
</repository>
2.3 Add the following content into section <dependencies>:
<dependency>
    <groupId>com.faizsiegeln.njams</groupId>
    <artifactId>njams-client-mule4-extension</artifactId>
    <version>5.0.0</version>
    <classifier>mule-plugin</classifier>
</dependency>
<dependency>
    <groupId>com.faizsiegeln.njams</groupId>
    <artifactId>njams-client-mule4</artifactId>
    <version>5.0.0</version>
</dependency>
2.4 Please make sure you are using recent version of the Mule Maven Plugin, e.g. 3.5.x or higher:
<properties>
    <project.build.sourceEncoding>UTF-8</project.build.sourceEncoding>
    <project.reporting.outputEncoding>UTF-8</project.reporting.outputEncoding>
    <app.runtime>4.6.1</app.runtime>
    <mule.maven.plugin.version>3.5.4</mule.maven.plugin.version>
</properties>
2.5 Optional: If you want to use JMS with ActiveMQ as communication layer, please add the following dependency as well:
<!-- https://mvnrepository.com/artifact/org.apache.activemq/activemq-client -->
<dependency>
    <groupId>org.apache.activemq</groupId>
    <artifactId>activemq-client</artifactId>
    <version>5.18.5</version>
</dependency>
Additionally, add the following to build/plugins/plugin org.mule.tools.maven within <configuration><sharedLibraries>
<sharedLibrary>
    <groupId>org.apache.activemq</groupId>
    <artifactId>activemq-client</artifactId>
</sharedLibrary>
2.6 Optional: If you want to use JMS with Azure Service Bus Premium as communication layer, please add the following dependency as well:
<dependency>
    <groupId>com.microsoft.azure</groupId>
    <artifactId>azure-servicebus-jms</artifactId>
    <version>1.0.2</version>
</dependency>
Additionally, add the following to build/plugins/plugin org.mule.tools.maven within <configuration><sharedLibraries>
<sharedLibrary>
    <groupId>com.microsoft.azure</groupId>
    <artifactId>azure-servicebus-jms</artifactId>
</sharedLibrary>
2.7 Save file
pom.xml. nJAMS Client for Mule4 is available now within your Mule project: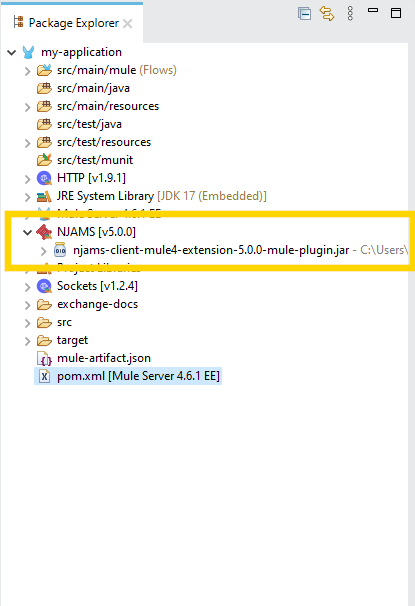
Summary: please find here a sample pom.xml for your project:
<?xml version="1.0" encoding="UTF-8"?>
<project xmlns="http://maven.apache.org/POM/4.0.0" xmlns:xsi="http://www.w3.org/2001/XMLSchema-instance" xsi:schemaLocation="http://maven.apache.org/POM/4.0.0 https://maven.apache.org/xsd/maven-4.0.0.xsd">
    <modelVersion>4.0.0</modelVersion>

    <groupId>com.mycompany</groupId>
    <artifactId>test-project</artifactId>
    <version>1.0.0-SNAPSHOT</version>
    <packaging>mule-application</packaging>

    <name>test-project</name>

    <properties>
        <project.build.sourceEncoding>UTF-8</project.build.sourceEncoding>
        <project.reporting.outputEncoding>UTF-8</project.reporting.outputEncoding>

        <app.runtime>4.6.1</app.runtime>
        <mule.maven.plugin.version>4.1.0</mule.maven.plugin.version>
    </properties>

    <build>
        <plugins>
            <plugin>
                <groupId>org.apache.maven.plugins</groupId>
                <artifactId>maven-clean-plugin</artifactId>
                <version>3.2.0</version>
            </plugin>
            <plugin>
                <groupId>org.mule.tools.maven</groupId>
                <artifactId>mule-maven-plugin</artifactId>
                <version>${mule.maven.plugin.version}</version>
                <extensions>true</extensions>
                <configuration>
                    <sharedLibraries>
                        <sharedLibrary>
                            <groupId>com.faizsiegeln.njams</groupId>
                            <artifactId>njams-client-mule4</artifactId>
                        </sharedLibrary>
                        <sharedLibrary>
                            <groupId>org.apache.activemq</groupId>
                            <artifactId>activemq-client</artifactId>
                        </sharedLibrary>
                    </sharedLibraries>
                </configuration>
            </plugin>
        </plugins>
    </build>

    <dependencies>
        <dependency>
            <groupId>org.mule.connectors</groupId>
            <artifactId>mule-http-connector</artifactId>
            <version>1.9.1</version>
            <classifier>mule-plugin</classifier>
        </dependency>
        <dependency>
            <groupId>org.mule.connectors</groupId>
            <artifactId>mule-sockets-connector</artifactId>
            <version>1.2.4</version>
            <classifier>mule-plugin</classifier>
        </dependency>

        <dependency>
            <groupId>com.faizsiegeln.njams</groupId>
            <artifactId>njams-client-mule4-extension</artifactId>
            <version>5.0.0</version>
            <classifier>mule-plugin</classifier>
        </dependency>
        <dependency>
            <groupId>com.faizsiegeln.njams</groupId>
            <artifactId>njams-client-mule4</artifactId>
            <version>5.0.0</version>
        </dependency>

        <dependency>
            <groupId>org.apache.activemq</groupId>
            <artifactId>activemq-client</artifactId>
            <version>5.18.5</version>
        </dependency>

    </dependencies>

    <repositories>
        <repository>
            <id>anypoint-exchange-v3</id>
            <name>Anypoint Exchange</name>
            <url>https://maven.anypoint.mulesoft.com/api/v3/maven</url>
            <layout>default</layout>
        </repository>
        <repository>
            <id>mulesoft-releases</id>
            <name>MuleSoft Releases Repository</name>
            <url>https://repository.mulesoft.org/releases/</url>
            <layout>default</layout>
        </repository>
        <repository>
            <id>integrationmatters-repo-release</id>
            <url>https://maven.integrationmatters.com/release</url>
        </repository>
    </repositories>

    <pluginRepositories>
        <pluginRepository>
            <id>mulesoft-releases</id>
            <name>MuleSoft Releases Repository</name>
            <layout>default</layout>
            <url>https://repository.mulesoft.org/releases/</url>
            <snapshots>
                <enabled>false</enabled>
            </snapshots>
        </pluginRepository>
    </pluginRepositories>

</project>
nJAMS Client for Mule4 is now ready for configuration. Follow the next chapter to setup nJAMS Client for Mule4 for different scenarios.
Inline Configuration#
nJAMS Client for Mule4 can be configured for different situations, depending on what you want to use. The nJAMS Client for Mule4 Connector dialog allows you to define the basic settings how nJAMS Client for Mule4 should work, as well as the communication settings depending on your nJAMS instance.
You can create multiple configurations and switch between them according to different purposes. For example, you may want to have a production configuration that allows nJAMS Client for Mule4 to communicate with a nJAMS Server instance. On the other hand you may want to switch to a small on-prem instance of nJAMS Server during development and test of your Mule application. Depending on the purpose, you can switch the configuration of nJAMS Client for Mule4 easily.
If you prefer a scripted deployment of your Mule projects, you may want to have pre-defined nJAMS Client for Mule4 configuration files that can be rolled out along with your Mule applications according to the staging environment.
For this scenario, you can use the nJAMS Client for Mule4 configuration file njams.properties as you may already know from other nJAMS Clients.
Note
In case you have multiple configurations, only the configuration will be considered, where nJAMS Client for Mule4 is enabled.
Let us now go through the individual inline configuration options.
Create configuration#
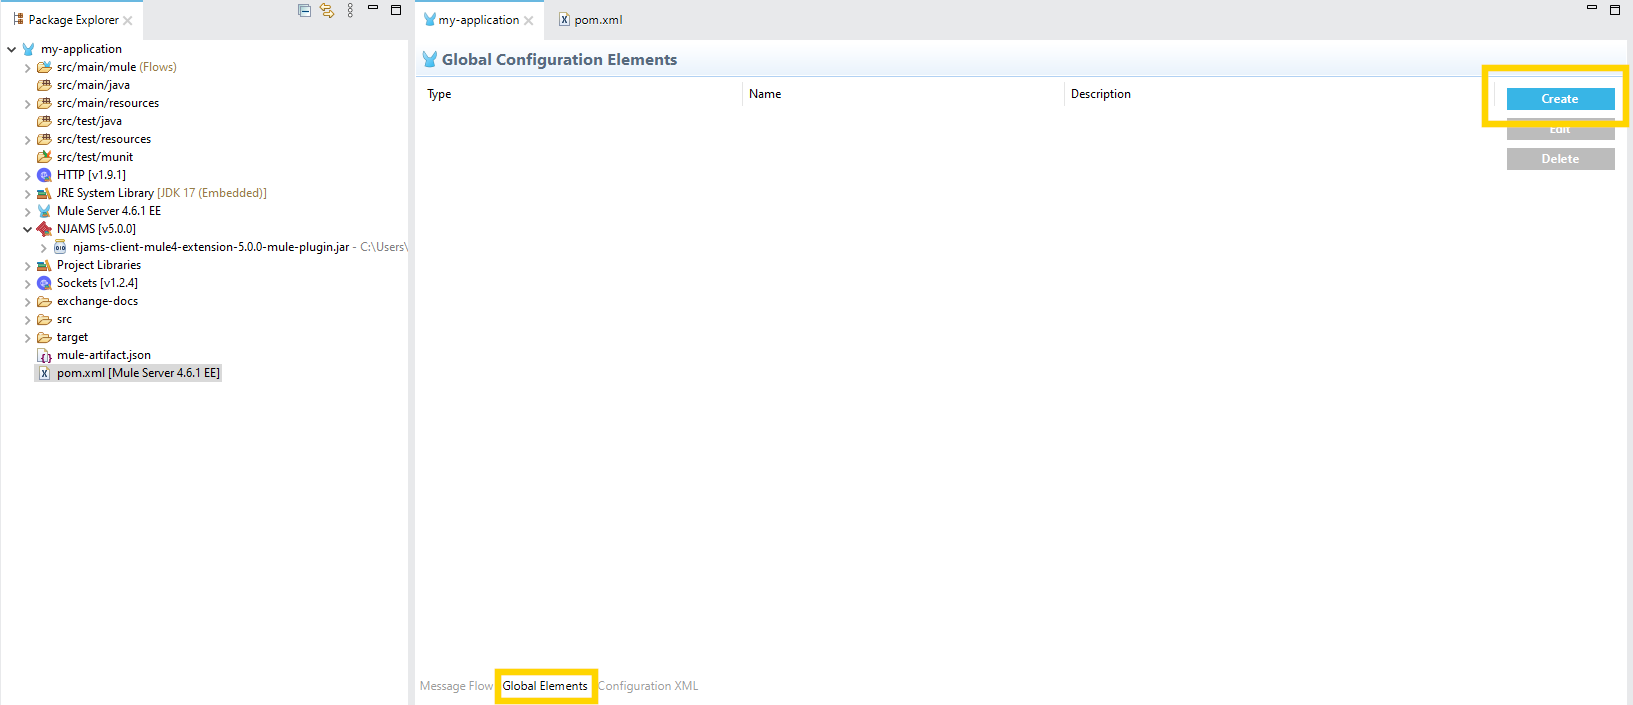
Open your Mule project in Anypoint Studio and enter Global Elements:
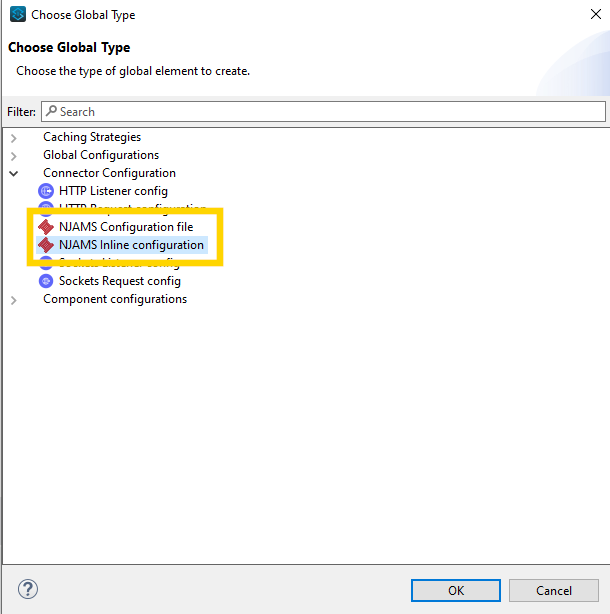
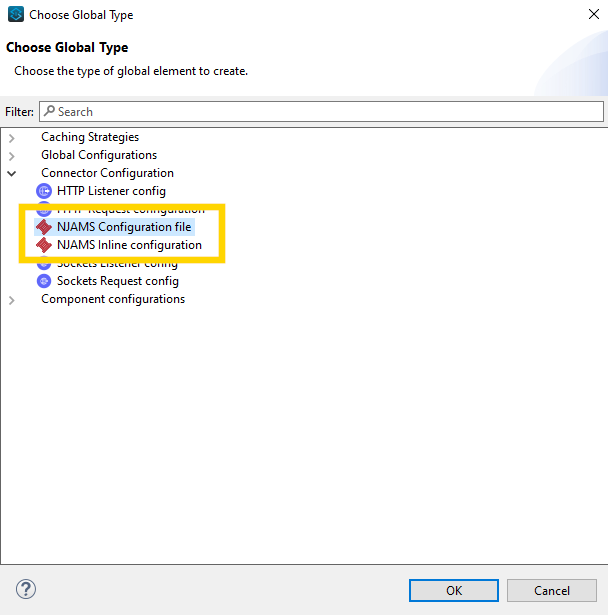
Click on Create and a new dialog pops up to choose the configuration type:
Select Njams Configuration file from category Connector Configuration, if you want to refer to a pre-defined configuration file. Refer to Configuration file to learn more about using nJAMS configuration file.
Select Njams Inline configuration, if you want to determine the configuration dialog-oriented. Read on, if you want to know more about this type of configuration.
General#
The general configuration determines basic settings of nJAMS Client for Mule4:
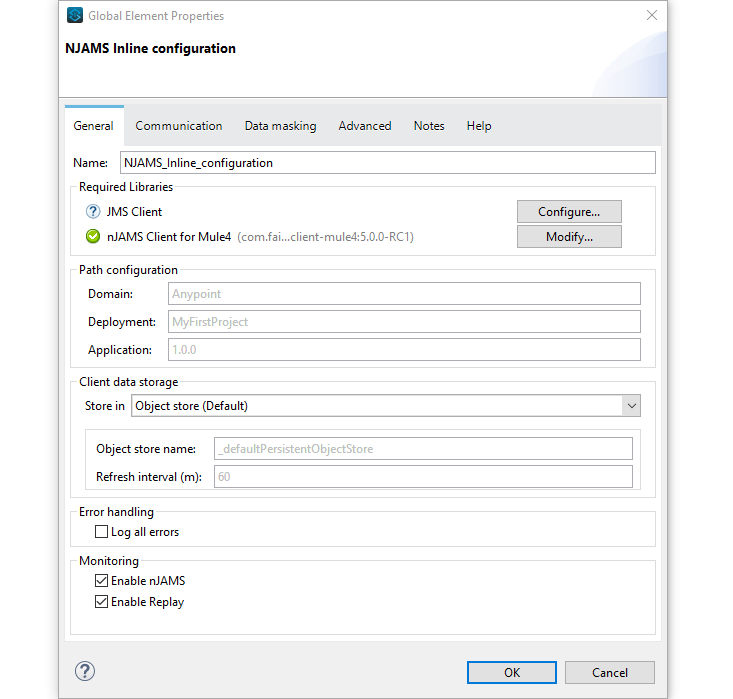
Enter a name for the configuration.
Select the JMS client library of your preferred JMS provider.
Path configuration allows you to determine the taxonomy of the Mule application in your nJAMS instance. You can specify individual names for Domain, Deployment, and Application under which the Mule application appears in the Domain Object Tree of your nJAMS instance. If you do not enter individual names, nJAMS Client for Mule4 will use default names.
The Client data storage specifies the place, where the application based nJAMS configuration is stored. This refers to the configuration, where nJAMS Client for Mule4 stores Extract definitions, whether Tracing is enabled/disabled, setting of LogLevel, etc.
- – Object store is the recommended storage location.
This setting stores the application based nJAMS configuration in the common Mule Object Store. You can specify an individual Object store name as well as the refresh rate that is used to frequently update the nJAMS configuration in the Object store.
– AWS S3 uses S3 storage to store application based nJAMS configuration. For using S3 you have to specify:

The name of your S3 bucket
Your access Key Id
Your secret Access Key
Enter AWS Region close to your location
- – Json file stores the application based nJAMS configuration into a JSON file of your choice on your local machine.
This option is only useful in designtime, when you are working with Anypoint Studio. In runtime environment, you should use the Object store.
- – Memory only temporarily stores the application based nJAMS configuration in memory.
After restarting Anypoint Studio, the nJAMS configuration is lost.
Error handling controls, when nJAMS Client for Mule4 should send error events.
trueautomatically creates error events for catched and uncatched exceptions.
falseautomatically creates error events only for uncatched exceptions (default).Monitoring allow to enable/disable nJAMS Client for Mule4 within your Mule application, as well as enable/disable nJAMS Replay functionality of nJAMS Client for Mule4.
Communication#
On tab Communication you can specify how nJAMS Client for Mule4 communicates with your nJAMS instance. The communication is bi-directional. On the one side nJAMS Client for Mule4 sends log events to the nJAMS instance, on the other side nJAMS Client for Mule4 receives commands from the nJAMS instance in order to turn on Tracing, for example. You can choose between the following targets:
HTTP instance:
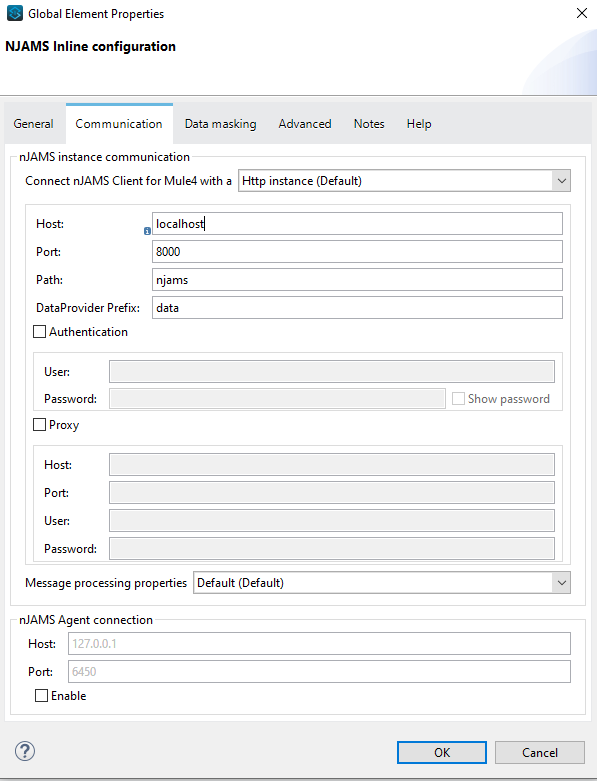
- Enter basic information:
Host IP
Port (default: 8000)
URI path (default: njams)
DataProvider Prefix. Make sure it matches with the configuration in your nJAMS Server instance.
Additionally you can enable Authentication and/or use a Proxy server.
Select Advanced, if you want to control message processing of nJAMS Client for Mule4.
HTTPS instance:
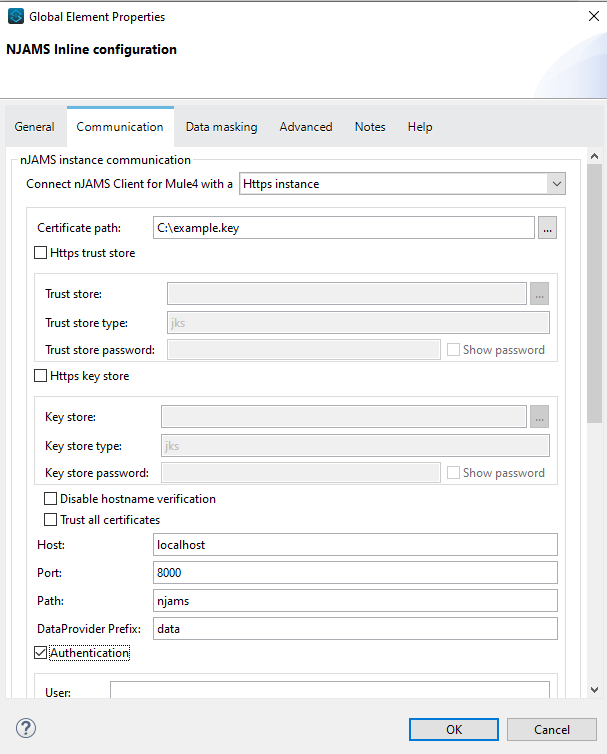
Select you SSL certificate.
- Enter basic information:
Host IP
Port (default: 8000)
URI path (default: njams)
DataProvider Prefix. Make sure it matches with the configuration in your nJAMS Server instance.
If needed, HTTPS trust and key stores can be configured.
Additionally you can enable Authentication and/or use a Proxy server.
Select Advanced, if you want to control message processing of nJAMS Client for Mule4.
Jms server:
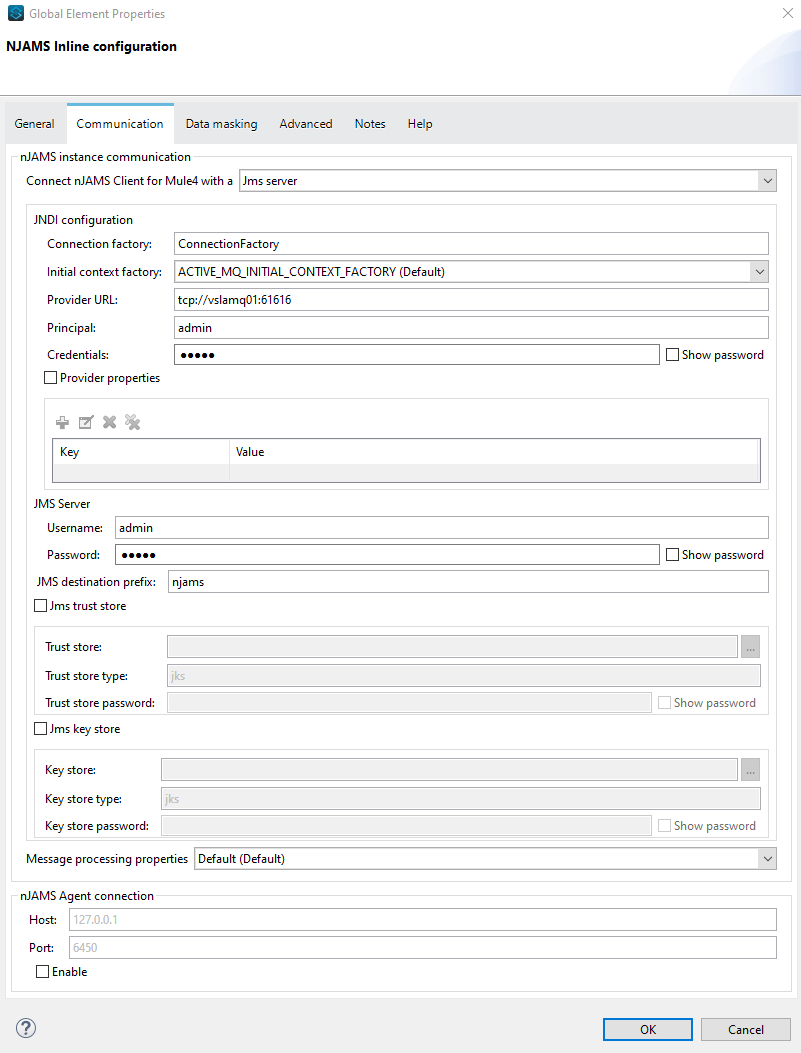
Make sure you already specified the JMS client library of your JMS provider as described before.
Enter JNDI configuration parameters of your JMS provider. You can select between two supported JMS providers so far:
ApacheMQ
TIBCO Enterprise Message Service
Enter credentials of your JMS server.
Select Advanced, if you want to control message processing of nJAMS Client for Mule4.
Kafka instance
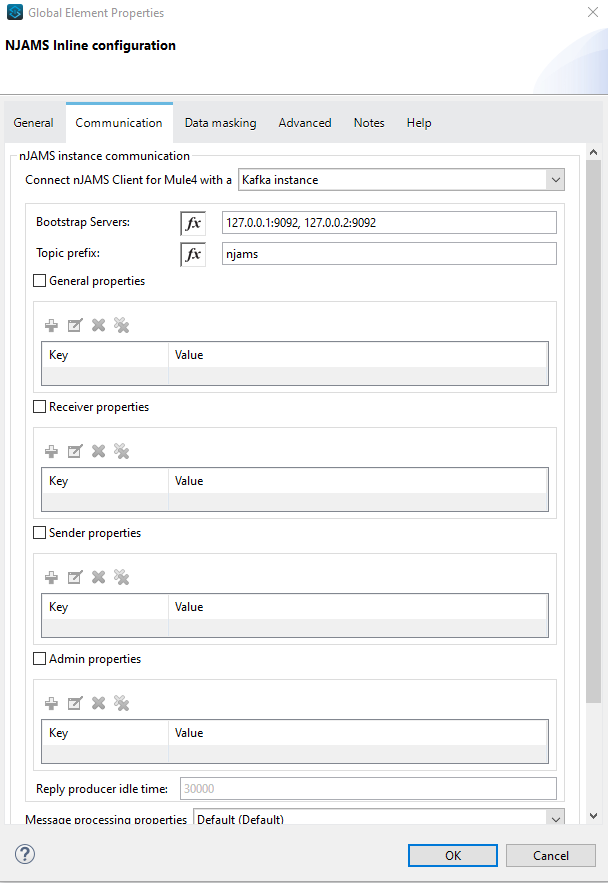
Provide a comma separated list of your Bootstrap servers and the topic prefix.
You can specify different properties according to your needs. Use the official Kafka documentation for a listing of supported configurations. Settings without further prefix are applied to all kinds of Kafka clients. If you use consumer, producer or admin properties, they will only apply to the according client type. Client type specific settings override settings without prefix.
Select Advanced, if you want to control message processing of nJAMS Client for Mule4.
Data masking#
This option allows you to mask confidential data in the log message. Use a regular expression to specify a pattern for data masking.
For example, the following regular expression replaces any information that matches a Social Security Number with an asterisk character (“*”):
(?!000|666)[0-8][0-9]{2}-(?!00)[0-9]{2}-(?!0000)[0-9]{4}In the Data masking dialog enter a name and the regex:
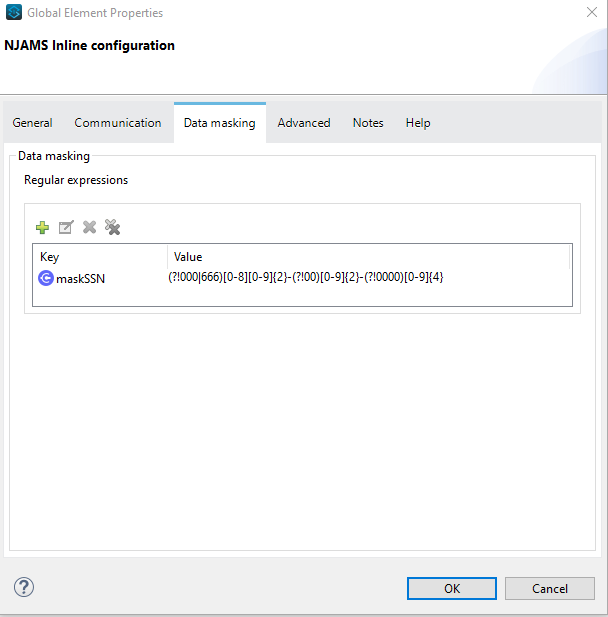
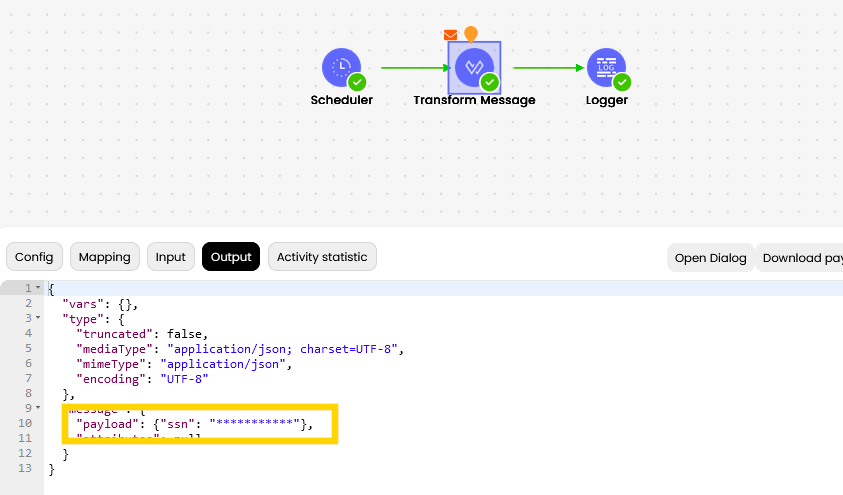
In nJAMS UI the Social Security Number is masked at each occurrence. For example, the occurence of a SSN in Trace Data will be masked as follows:
Also the outcome of an Extract will be masked correctly in the Result list:

Advanced#
The Advanced tab offers some additional configuration.
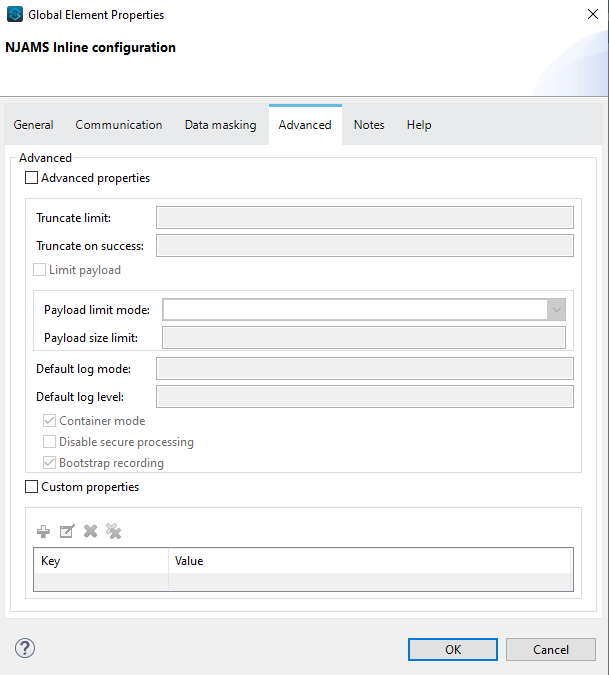
Truncate limit: When setting this option to a positive number, the nJAMS client will stop sending detailed activity- and transition information to the server once that number of activities has been reached. The client will however continue sending job status- and event information. In nJAMS Server you will not see transitions between activities for such job instances.
Truncate on success: When this setting is enabled (true), the nJAMS client will not send detailed activity- and transition information for job instances that completed successfully. The client will however send job status- and event information. Job instances completing with any other status than success are not affected by this setting. In nJAMS server you will not see transitions between activities for such job instances. This setting has only limited effect on job instances that send more than a single message because it only affects the last message being sent.
Limit payload: When this setting is set to either truncate or discard large payloads like input, output, event-payload. event-stack, or attribute-values are either truncated or discarded when they reach the limit configured with payload size limit.
Default log mode: Defines the default log-mode that is used until the client’s configuration contains a specific setting for that. Choose between NONE, EXCLUSIVE or COMPLETE.
Default log level: Defines the default log-level that is used until a process’ configuration contains a specific setting for that. Choose between INFO, SUCCESS, WARNING, ERROR.
Container mode: If this setting is true, nJAMS will generate a unique client ID, which is used to identify the correct client in a multi- node/replica/pod container environment.
Disable secure processing: If this setting is true, secure XML processing feature will not be initialized. This can be helpful for an environment containing an old XML lib, which does not support this.
Bootrap recording: This is a one-time setting that is only used when bootstrapping a new nJAMS client instance. It is used for setting the initial default value for client- (engine-) wide recording of start-data. Once a configuration for a client has been created, this setting has no more effect. Set this option to false to initially disable recording of start-data.
Notes#
Make some notes with regards to the current configuration.
Run Mule application with nJAMS Client for Mule4#
nJAMS Client for Mule4 is now ready to monitor your Mule application.
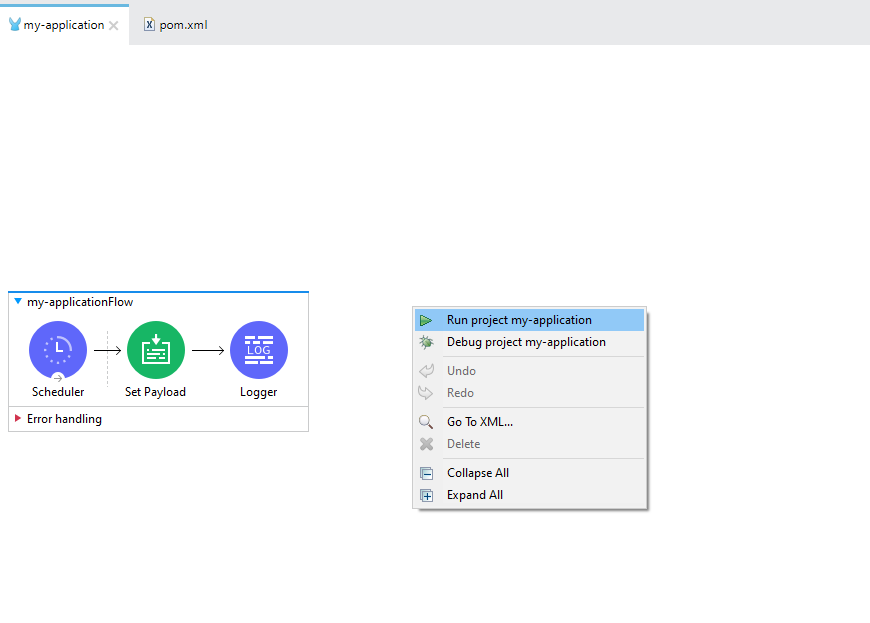
As a first test you can start your Mule application in Anypoint Studio. Go to tab Message Flow, right click on the pane and select Run project:
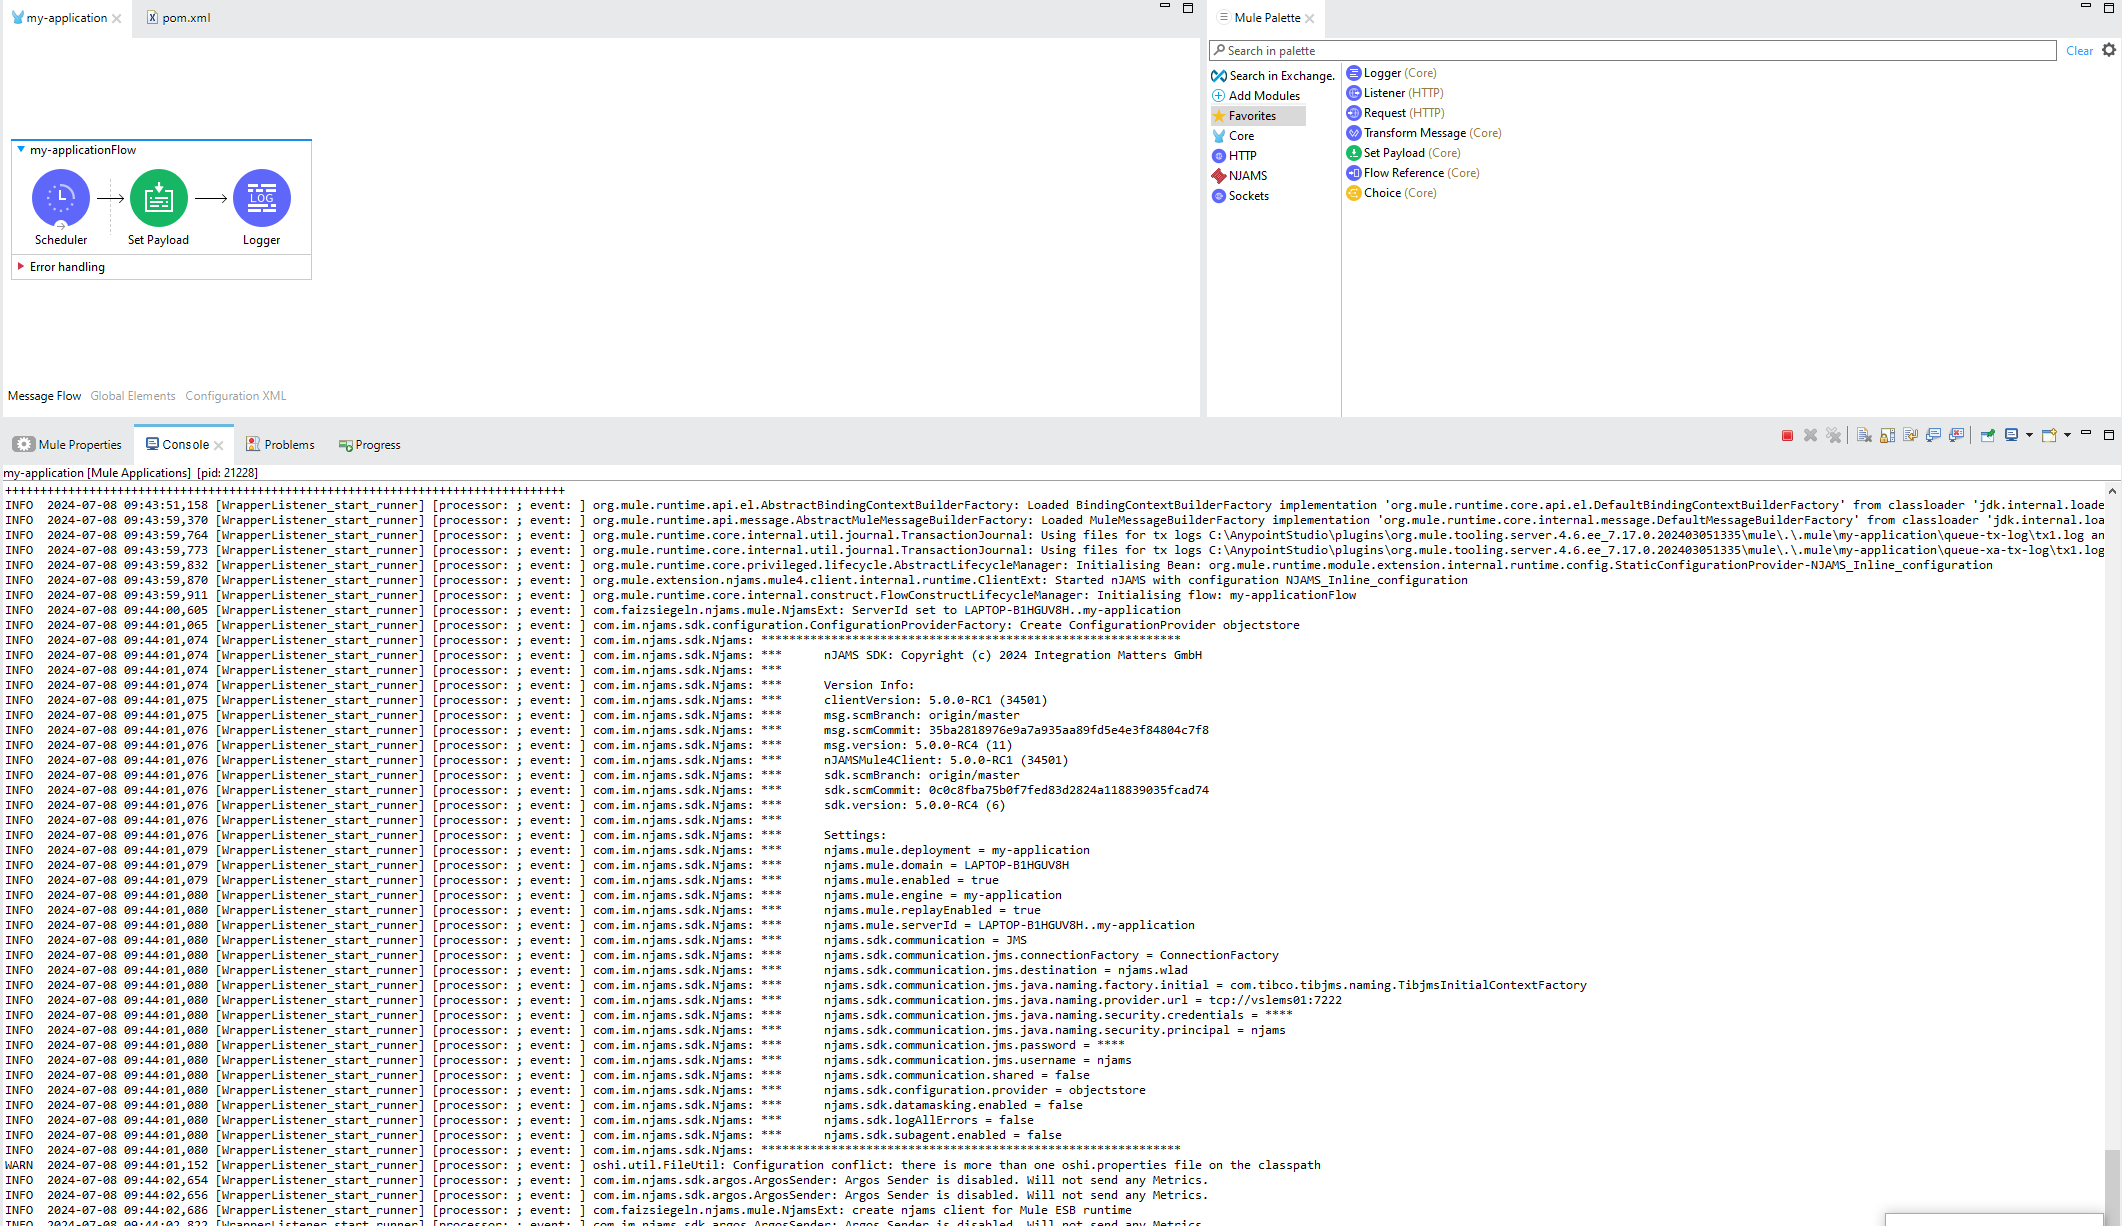
During the startup of your Mule application, nJAMS Client for Mule4 will also be initialized. See nJAMS Client for Mule4 banner text in console output:
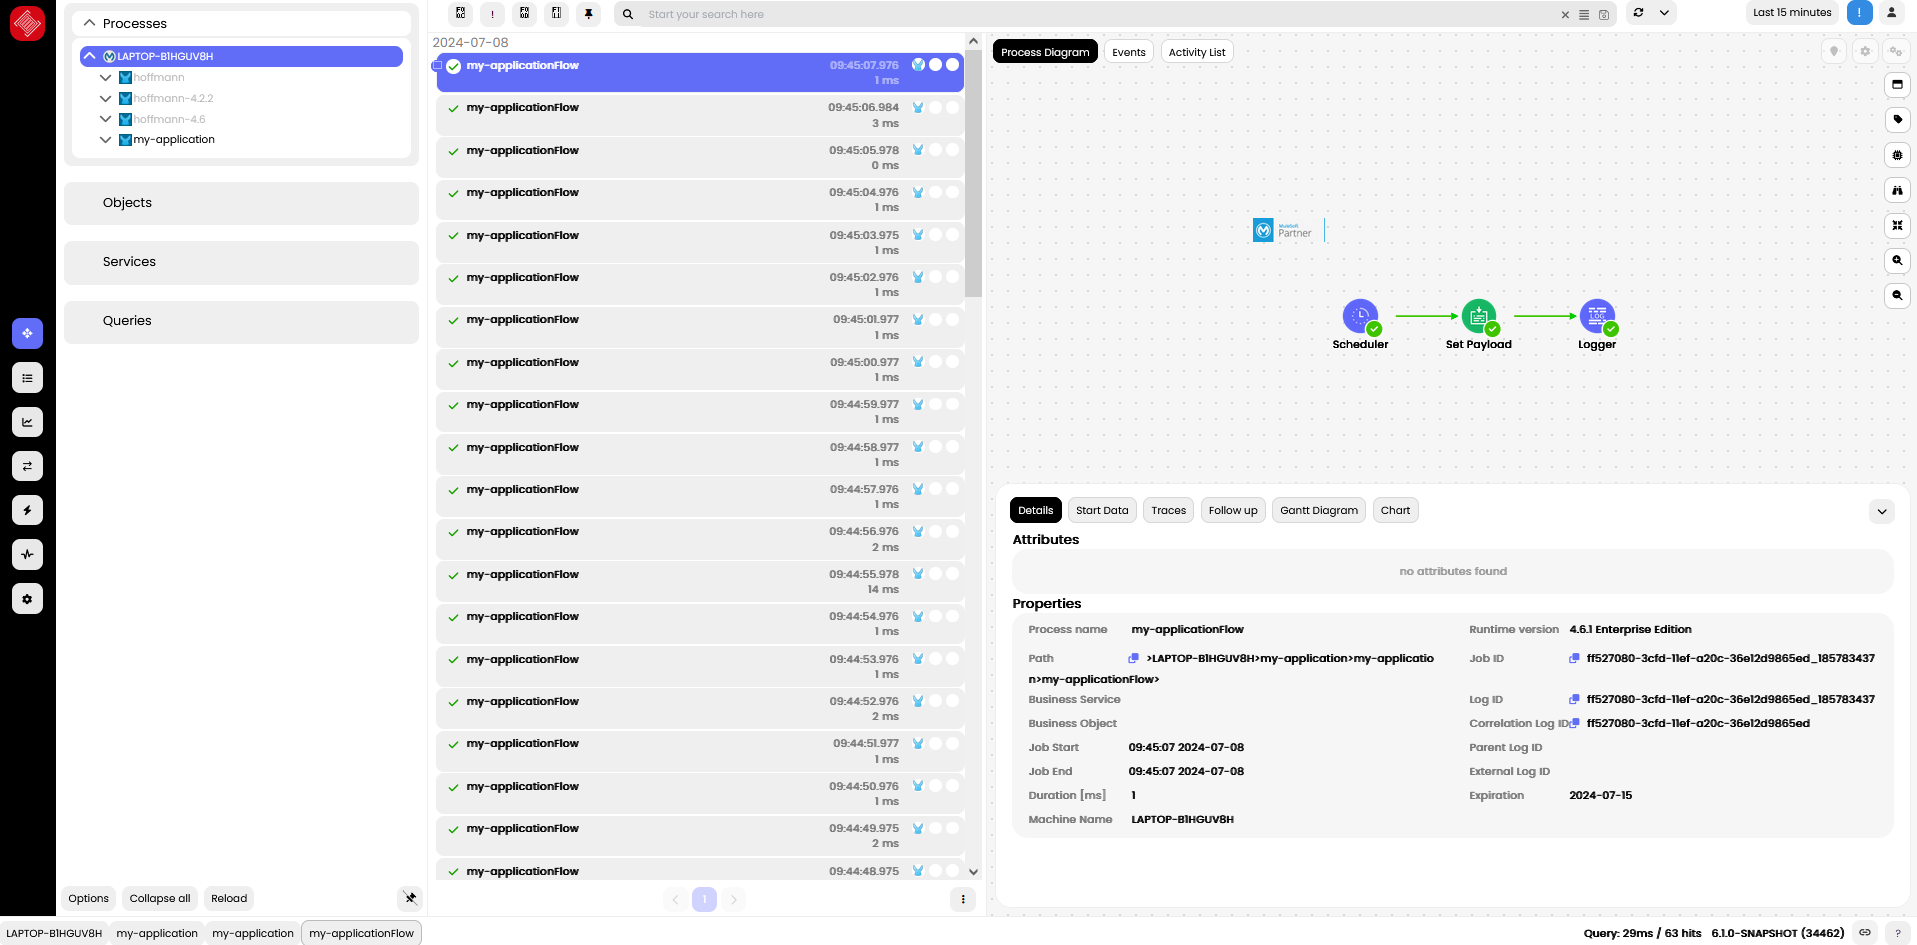
Enter your nJAMS instance and watch the results of each flow execution of your Mule application:
Configuration file#
For using nJAMS configuration file in contrast to Inline configuration, as decribed before, you have to select Njams Configuration file from Connector Type list:
Create file njams.properties and save the file into a separate folder of resources within your Mule project.
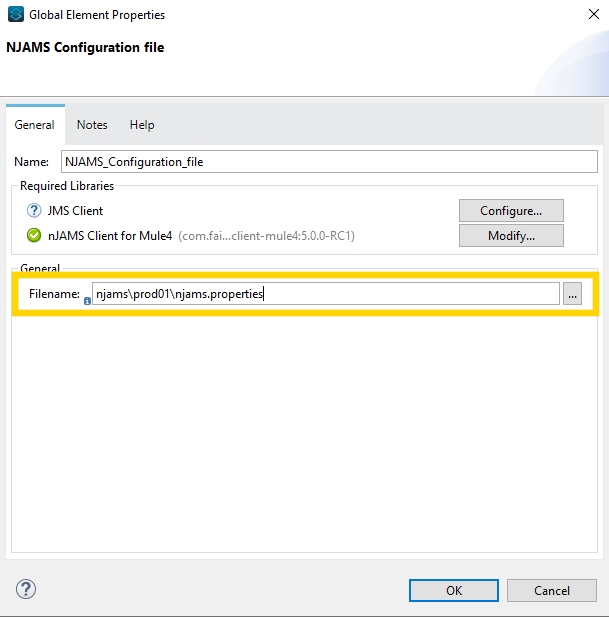
In the following dialog you can enter the path to an existing njams.properties file:
Please find below a sample njams.properties file:
# Global settings:
njams.mule.enabled = true
njams.mule.replay.enabled = true

#nJAMS Subagent
njams.sdk.subagent.enabled = true
njams.sdk.subagent.host = 127.0.0.1
njams.sdk.subagent.port = 6450

## SDK configuration
# Communication settings
njams.sdk.communication=JMS

# JMS settings
njams.sdk.communication.jms.connectionFactory=QueueConnectionFactory
njams.sdk.communication.jms.username=admin
njams.sdk.communication.jms.password=admin
njams.sdk.communication.jms.destination=dynamicQueues/njams

# JNDI settings
njams.sdk.communication.jms.java.naming.factory.initial=org.apache.activemq.jndi.ActiveMQInitialContextFactory
njams.sdk.communication.jms.java.naming.security.principal=admin
njams.sdk.communication.jms.java.naming.security.credentials=admin
njams.sdk.communication.jms.java.naming.provider.url=tcp\://localhost\:61616
This sample configuration file configures communication with nJAMS Server over ActiveMQ and enables Replay and the Subagent.
Note
When you are using Mule RTF it is recommended to also configure the taxonomy in order to avoid getting new entries in the domain object tree each time you start the Mule application.
For example:
njams.mule.domain=RTF-DEV
njams.mule.deployment=my-process-api
For more details about configuration options, please refer to Reference: Client Configuration.
Multiple Configurations#
In some cases you want so set up multiple nJAMS configurations and switch between them. Make sure that only one configuration is enabled. The following shows an example setup with an nJAMS configuration file for the production environment (enabled) and a nJAMS inline configuration for testing (disabled).
Configuration file:
#Global settings
njams.mule.enabled = true
...
Inline configuration:
