Installation and configuration using Mule Spring Module#
In previous versions nJAMS Client for Mule4 was basically installed by using the Mule Spring Module to your Mule project. This approach is still vaild and can be used alternatively to the new installation via Anypoint Connector.
Overview#
The installation of nJAMS Client for Mule4 using Mule Spring Module consists essentially of the following steps:
Add nJAMS Client for Mule4 as a dependency to Mule POM file
Adding the Mule Spring Module
Configuring the Mule Spring Module
Create a connection to nJAMS Server, respectively nJAMS Cloud
Adding a JMS library, if using nJAMS Client for Mule4 with nJAMS Server
First test of nJAMS Client for Mule4 in Anypoint Studio
Create a Mule Deployable Archive of your Mule project and deploy it
See monitoring results of nJAMS Client for Mule4 in nJAMS GUI
Step by step#
Please follow these instructions in detail to install nJAMS Client for Mule4. The installation steps are valid for both on-premise and MuleSoft CloudHub deployments.
nJAMS Client for Mule4 consists of a single JAR file that needs to be added as a dependency to all Mule projects that should be deployed. The easiest way is to use the maven repository provided by Integration Matters. Therefore open your Mule project POM file and add the following into the corresponding sections:
Add the “repository” into the “repositories” section (detailed information under: https://maven.apache.org/guides/mini/guide-multiple-repositories.html):
<repository>
    <id>integrationmatters-repo-release</id>
    <url>https://maven.integrationmatters.com/release</url>
</repository>
Add the following block to your POM files “dependencies” section:
<dependency>
    <groupId>com.faizsiegeln.njams</groupId>
    <artifactId>njams-client-mule4</artifactId>
    <version>4.1.2</version>
</dependency>
Note
Please adapt the dependency configuration according to the correct version number of nJAMS Client for Mule4 you are using. The configuration above uses version 4.1.2, which you may need to change.
Add the following block to your POM files “sharedLibraries” section:
<sharedLibrary>
    <groupId>com.faizsiegeln.njams</groupId>
    <artifactId>njams-client-mule4</artifactId>
</sharedLibrary>
Please take this as a sample for your final POM file:
<?xml version="1.0" encoding="UTF-8" standalone="no"?>
<project xmlns="http://maven.apache.org/POM/4.0.0" xmlns:xsi="http://www.w3.org/2001/XMLSchema-instance"
    xsi:schemaLocation="http://maven.apache.org/POM/4.0.0 http://maven.apache.org/maven-v4_0_0.xsd">
    <modelVersion>4.0.0</modelVersion>

    <groupId>com.mycompany</groupId>
    <artifactId>helloworld</artifactId>
    <version>1.0.0-SNAPSHOT</version>
    <packaging>mule-application</packaging>

    <name>HelloWorld</name>

    <properties>

        ...

    </properties>

    <build>
        <plugins>
            <plugin>
                <groupId>org.mule.tools.maven</groupId>
                <artifactId>mule-maven-plugin</artifactId>
                <version>${mule.maven.plugin.version}</version>
                <extensions>true</extensions>
                <configuration>
                    <sharedLibraries>
                        <!-- njams shared libraries -->
                        <sharedLibrary>
                            <groupId>org.apache.activemq</groupId>
                            <artifactId>activemq-client</artifactId>
                        </sharedLibrary>
                        <sharedLibrary>
                            <groupId>com.faizsiegeln.njams</groupId>
                            <artifactId>njams-client-mule4</artifactId>
                        </sharedLibrary>

                        ...

                    </sharedLibraries>
                </configuration>
            </plugin>
        </plugins>
    </build>

    <dependencies>

        <dependency>
            <groupId>com.faizsiegeln.njams</groupId>
            <artifactId>njams-client-mule4</artifactId>
            <version>4.1.2/version>
            </dependency>
            <dependency>
                <groupId>org.apache.activemq</groupId>
                <artifactId>activemq-client</artifactId>
                <version>5.15.9</version>
            </dependency>

        ...

        </dependencies>

        <repositories>
            <repository>
                <id>integrationmatters-repo-release</id>
                <url>https://maven.integrationmatters.com/release</url>
            </repository>

        ...

        </repositories>
        <pluginRepositories>
        ...
        </pluginRepositories>

    </project>
- If you prefer to add a dependency manually to all Mule projects using your Maven repository, follow these steps:
The first step is to add the nJAMS Client for Mule4 JAR file to your Maven repository, for example Nexus or Artifactory. Please check with your local Maven repository administrator to upload the JAR file to your repository. If you do not have a central Maven repository you can still add the JAR file manually to your local Maven installation and use it in your Mule Project using this command line:
mvn install:install-file -Dfile=<path-to-file>
You must use version 2.5 of the Maven install plugin. To force this version use:
mvn org.apache.maven.plugins:maven-install-plugin:2.5.1:install-file -Dfile=<path-to-file>
- Example:
ubuntu@OS1129:/home/ubuntu# mvn install:install-file -Dfile=/home/ubuntu/Downloads/njams-client-mule4-4.1.2.jar

[INFO] Scanning for projects...Downloading: https://repo.maven.apache.org/maven2/org/apache/maven/plugins/maven-clean-plugin/2.5/maven-clean-plugin-2.5.pom
[...]
[INFO] Installing /home/ubuntu/Downloads/njams-client-mule4-4.1.2.jar to /root/.m2/repository/com/faizsiegeln/njams/njams-client-mule4/4.1.2/njams-client-mule4-4.1.2.jar
[INFO] Installing /tmp/mvninstall2421552712311570335.pom to /root/.m2/repository/com/faizsiegeln/njams/njams-client-mule4/4.1.2/njams-client-mule4-4.1.2.pom
[INFO] ------------------------------------------------------------------------
[INFO] BUILD SUCCESS
[INFO] ------------------------------------------------------------------------
[INFO] Total time: 2.441 s
[INFO] Finished at: 2019-06-19T13:40:30+00:00
[INFO] Final Memory: 14M/321M
[INFO] ------------------------------------------------------------------------
You can validate the upload to your local Maven repository succeeded and the artifact can be resolved using this command line, for example:
ubuntu@OS1129:/home/ubuntu# mvn dependency:get -Dartifact=com.faizsiegeln.njams:njams-client-mule4:4.1.2.0 -o -DremoteRepositories=file:/home/ubuntu/.m2/

[INFO] Scanning for projects...
[INFO]
[INFO] ------------------------------------------------------------------------
[INFO] Building Maven Stub Project (No POM) 1
[INFO] ------------------------------------------------------------------------
[INFO]
[INFO] --- maven-dependency-plugin:2.8:get (default-cli) @ standalone-pom ---
[INFO] Resolving com.faizsiegeln.njams:njams-client-mule4:jar:4.1.2 with
transitive dependencies
[INFO] ------------------------------------------------------------------------
[INFO] BUILD SUCCESS
[INFO] ------------------------------------------------------------------------
[INFO] Total time: 0.941 s
[INFO] Finished at: 2019-06-19T13:48:33+00:00
[INFO] Final Memory: 13M/304M
[INFO] ------------------------------------------------------------------------
The next step is to add nJAMS as a Maven dependency in the Mule project’s
pom.xml:<dependency> <groupId>com.faizsiegeln.njams</groupId> <artifactId>njams-client-mule4</artifactId> <version>4.1.2</version> </dependency> Then find the sharedLibraries section in the pom.xml and add nJAMS to it: <sharedLibrary> <groupId>com.faizsiegeln.njams</groupId> <artifactId>njams-client-mule4</artifactId> </sharedLibrary>
Note
Please adapt the dependency configuration according to the correct version number of nJAMS Client for Mule4 you are using. The configuration above uses version 4.1.2, which you may need to change.
If, after saving the project, the Anypoint Studio is showing the following error, the nJAMS artifact was not found in your local or remote Maven repository:
Failed to resolve module com.faizsiegeln.njams:njams-client-mule4:4.1.2 (hover for more details or open this problem's Properties)
Please see the previous chapter for more details on how to register the nJAMS Client for Mule4 as an artifact in Maven.
Configuration#
Adding the Mule Spring Module
Starting with Mule Runtime version 4 the Spring module is no longer a standard module for Mule applications. As nJAMS Client for Mule4 is implemented as a Spring bean, the Spring module has to be added to each Mule project. To install the Spring Module please refer to Mulesoft’s online manual.
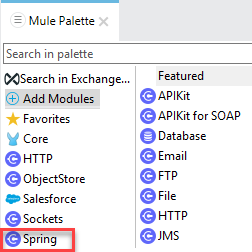
Once installed, it needs to be added to the project. This can easily be achieved by selecting “Add Module” in the Mule Palette window and dragging the Spring module to the drop area:

The Spring module should now be listed under the referenced Modules:
Configuring the Mule Spring Module
In your Mule project create, or modify, a Mule Configuration file
src/main/mule/global.xmlwith the following content to load the Spring configuration:<?xml version="1.0" encoding="UTF-8"?> <mule xmlns="http://www.mulesoft.org/schema/mule/core" xmlns:doc="http://www.mulesoft.org/schema/mule/documentation" xmlns:xsi="http://www.w3.org/2001/XMLSchema-instance" xmlns:spring="http://www.mulesoft.org/schema/mule/spring" xsi:schemaLocation="http://www.mulesoft.org/schema/mule/core http://www.mulesoft.org/schema/mule/core/current/mule.xsd http://www.springframework.org/schema/beans http://www.springframework.org/schema/beans/spring-beans-current.xsd http://www.mulesoft.org/schema/mule/spring http://www.mulesoft.org/schema/mule/spring/current/mule-spring.xsd"> <spring:config name="springConfig" files="spring.xml" /> </mule>
Then create the Spring configuration file
src/main/resources/spring.xmlwith this content:<?xml version="1.0" encoding="UTF-8"?> <beans xmlns="http://www.springframework.org/schema/beans" xmlns:context="http://www.springframework.org/schema/context" xmlns:xsi="http://www.w3.org/2001/XMLSchema-instance" xmlns:aop="http://www.springframework.org/schema/aop" xsi:schemaLocation="http://www.springframework.org/schema/beans http://www.springframework.org/schema/beans/spring-beans-4.1.xsd http://www.springframework.org/schema/context http://www.springframework.org/schema/context/spring-context-4.1.xsd http://www.springframework.org/schema/aop http://www.springframework.org/schema/aop/spring-aop-4.0.xsd"> <bean class="org.springframework.context.annotation.CommonAnnotationBeanPostProcessor"/> <bean id="njamsClient" class="com.faizsiegeln.njams.mule.Client"> <property name="filename" value="/njams/njams.properties"/> </bean> </beans>
Create a connection to nJAMS Server, respectively nJAMS Cloud
The final configuration file that needs to be created is
njams.properties.The default location is
src/main/resources/njams/njams.properties. It can be placed anywhere in the project structure, but requires thefilenameproperty of the bean configuration in thespring.xmlfile to be adjusted accordingly (it defaults tonjams/njams.properties).You can choose whether you want to connect nJAMS Client for Mule4 to nJAMS Server or nJAMS Cloud.
- Configure a connection to nJAMS Server:
For using nJAMS Client for Mule4 with nJAMS Server you have to configure a JMS connection. This example demonstrates a JMS connection against ActiveMQ:
njams.sdk.communication=JMS
njams.sdk.communication.jms.username=njams
njams.sdk.communication.jms.password=njams

#Apache active MQ
njams.sdk.communication.jms.java.naming.factory.initial=org.apache.activemq.jndi.ActiveMQInitialContextFactory
njams.sdk.communication.jms.java.naming.provider.url=tcp://localhost:61616
njams.sdk.communication.jms.destination=dynamicQueues/njams
njams.sdk.communication.jms.connectionFactory=ConnectionFactory
njams.sdk.communication.jms.destination.commands=dynamicTopics/njams.commands
- Configure a connection to nJAMS Cloud:
For using nJAMS Client for Mule4 with nJAMS Cloud, you have to configure a HTTPS connection against your nJAMS Cloud instance. Your nJAMS Cloud instance provides the required certificates and settings for your nJAMS Client for Mule4 configuration. Add your individual certificates to your Mule project and enter the communication properties in
njams.propertiesaccordingly.Add certificates:
Log in into your nJAMS Cloud instance and download a set of personalized certificates. The certificates must be added to the Mule project to the
src/main/resources/njams/certsdirectory: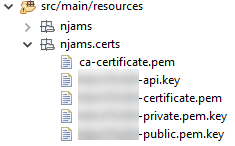
Enter connection properties in
njams.properties:The following example contains a configuration for addressing an nJAMS Cloud instance:
njams.sdk.communication.cloud.endpoint=ingest.integrationmatters.com
njams.sdk.communication.cloud.apikey=/opt/tibco/njams/certificates/myId-api.key
njams.sdk.communication.cloud.client.instanceId=myId
njams.sdk.communication.cloud.client.certificate=/opt/tibco/njams/certificates/myId-certificate.pem
njams.sdk.communication.cloud.client.privatekey=/opt/tibco/njams/certificates/myId-private.pem.key
Please refer to chapter “References” for more details and options for this file.
Adding a JMS library, if applicable
If you want nJAMS Client for Mule4 to send monitoring data to nJAMS Server, a JMS client library is required. It must be registered as a Maven dependency and exported as a shared library.
The following example uses the ActiveMQ client libraries:
<dependency>
    <groupId>org.apache.activemq</groupId>
    <artifactId>activemq-client</artifactId>
    <version>5.15.9</version>
</dependency>
Also, add this to the sharedLibraries section:
<sharedLibrary>
    <groupId>org.apache.activemq</groupId>
    <artifactId>activemq-client</artifactId>
</sharedLibrary>
There is no additional library required, if you are using nJAMS Client for Mule4 with nJAMS Cloud.
First test of nJAMS Client for Mule4 in Anypoint Studio
Now you can run the application inside Anypoint Studio with nJAMS.
Create a Mule Deployable Archive of your Mule project and deploy it
Start Mule with nJAMS#
Restart Mule Server with a deployed application. Verify the banner text information to make sure that nJAMS Client for Mule4 has been started successfully, for example:
com.im.njams.sdk.Njams: ************************************************************
com.im.njams.sdk.configuration.ConfigurationProviderFactory: Create ConfigurationProvider objectstore
com.im.njams.sdk.Njams: ***      nJAMS SDK: Copyright (c) 2020 Faiz & Siegeln Software GmbH
com.im.njams.sdk.Njams: ***
com.im.njams.sdk.Njams: ***      Version Info:
com.im.njams.sdk.Njams: ***      scmBranch: origin/4.0.X
com.im.njams.sdk.Njams: ***      nJAMSMule4Client: 4.1
com.im.njams.sdk.Njams: ***      cloudCommunicationVersion: 4.0.16 (75)
com.im.njams.sdk.Njams: ***      scmCommit: c56e88dd73721b9b35e4f1a07cb7ce4ca9b27d2c
com.im.njams.sdk.Njams: ***      sdkVersion: 4.0.16 (75)
com.im.njams.sdk.Njams: ***      clientVersion: 4.1
com.im.njams.sdk.Njams: ***      currentYear: 2020
com.im.njams.sdk.Njams: ***
com.im.njams.sdk.Njams: ***      Settings:
com.im.njams.sdk.Njams: ***      njams.client.sdk.deployment = my_application
com.im.njams.sdk.Njams: ***      njams.client.sdk.domain = vswtibbw06
com.im.njams.sdk.Njams: ***      njams.client.sdk.engine = my_application
com.im.njams.sdk.Njams: ***      njams.disabled = false
com.im.njams.sdk.Njams: ***      njams.mule.replayEnabled = true
com.im.njams.sdk.Njams: ***      njams.sdk.communication = CLOUD
com.im.njams.sdk.Njams: ***      njams.sdk.communication.cloud.apikey = C:\mulesoft\AnypointStudio\plugins\org.mule.tooling.server.4.2.2.ee_7.3.5.202001031809\mule\apps\my_application\njams\prod01\1b7e71187c-api.key
com.im.njams.sdk.Njams: ***      njams.sdk.communication.cloud.certificate = C:\mulesoft\AnypointStudio\plugins\org.mule.tooling.server.4.2.2.ee_7.3.5.202001031809\mule\apps\my_application\njams\prod01\1b7e71187c-certificate.pem
com.im.njams.sdk.Njams: ***      njams.sdk.communication.cloud.endpoint = ingest.integrationmatters.com
com.im.njams.sdk.Njams: ***      njams.sdk.communication.cloud.instanceid = C:\mulesoft\AnypointStudio\plugins\org.mule.tooling.server.4.2.2.ee_7.3.5.202001031809\mule\apps\my_application\njams\prod01\1b7e71187c-instanceId
com.im.njams.sdk.Njams: ***      njams.sdk.communication.cloud.privatekey = C:\mulesoft\AnypointStudio\plugins\org.mule.tooling.server.4.2.2.ee_7.3.5.202001031809\mule\apps\my_application\njams\prod01\1b7e71187c-private.pem.key
com.im.njams.sdk.Njams: ***      njams.sdk.configuration.provider = objectstore
com.im.njams.sdk.Njams: ***      njams.sdk.datamasking.enabled = false
com.im.njams.sdk.Njams: ***      njams.sdk.logAllErrors = false
com.im.njams.sdk.Njams: ***      njams.sdk.subagent.enabled = true
com.im.njams.sdk.Njams: ************************************************************
com.im.njams.sdk.argos.ArgosSender: Enabled Argos Sender with target address localhost/127.0.0.1:6450
com.faizsiegeln.njams.mule.NjamsExt: create njams client for Mule ESB runtime
com.faizsiegeln.njams.mule.ApplicationClientFactory: nJAMS Project created for client vswtibbw06..my_application containing the following flows: my_applicationFlow
com.faizsiegeln.njams.mule.stores.CLOUDHUBConfigurationStoreProvider: Loading key '>vswtibbw06>my_application>my_application>' from store '_defaultPersistentObjectStore'.
com.faizsiegeln.njams.mule.stores.CLOUDHUBConfigurationStoreProvider: configuration loaded and applied
com.im.njams.sdk.Njams: DataMasking is disabled.
com.im.njams.sdk.communication.CommunicationFactory: Create Receiver CLOUD
com.im.njams.sdk.communication.cloud.CloudReceiver: Creating KeyStorePasswordPair from C:\mulesoft\AnypointStudio\plugins\org.mule.tooling.server.4.2.2.ee_7.3.5.202001031809\mule\apps\my_application\njams\prod01\1b7e71187c-certificate.pem and C:\mulesoft\AnypointStudio\plugins\org.mule.tooling.server.4.2.2.ee_7.3.5.202001031809\mule\apps\my_application\njams\prod01\1b7e71187c-private.pem.key
com.im.amazonaws.services.iot.client.core.AwsIotConnection: Connection successfully established
com.im.amazonaws.services.iot.client.core.AbstractAwsIotClient: Client connection active: efbnbau_1ea32bd090c2f1958b1b7ae890576b3a8497607c05c26244766792a4b9f57a30
com.im.njams.sdk.communication.CommunicationFactory: Create sender CLOUDS
See monitoring results of nJAMS Client for Mule4 in nJAMS GUI.
Log in into your nJAMS Server or nJAMS Cloud instance and see the incoming monitoring data of nJAMS Client for Mule4.