Advanced#
Recommendations to setup an Elasticsearch cluster for production#
Elasticsearch is the fundamental persistence layer of an nJAMS instance. The demands on the Elasticsearch cluster can be very different. For example, nJAMS installer installs a single node cluster of Elasticsearch, which might be sufficient for a small environment, like a development machine.
When demands increase, the cluster will have to be dimensioned larger. Especially for production environments you should think about aspects such as availability, scalability, and performance, when planning the setup of your Elasticsearch cluster.
This chapter is about basic recommendations for setting up an Elasticsearch cluster for production.
- Structure of the cluster:
In terms of reliability and scalability, the basic structure of the cluster should consist of two or more data nodes and at least three separate master nodes:
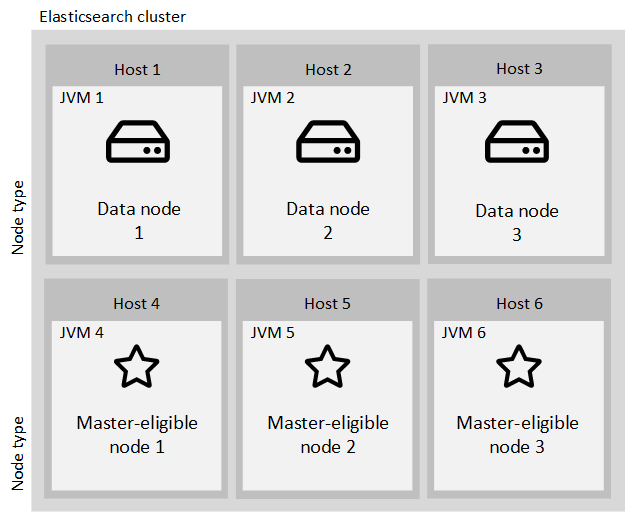
- Data nodes:
Data nodes are the core nodes in an Elasticsearch cluster that do the main working tasks like indexing (storing) documents and searching for them. Therefore, scaling of Data nodes is essential for cluster performance. Data nodes need to have both sufficient disk size for storing all data and enough RAM for building internal structures for effective searching and adequate CPU for coping with processing needs.
RAM assignment must follow these rules:
Do not apply more than 31 GB to a single node
Make sure that at least twice the amount of RAM that is assigned to a Data node is available as free memory on the host. For instance, when assigning 16 GB to a node, the host machine should have at least 32 GB of RAM. The additional memory is also utilized by the Data node.
The maximum heap you can assign is 31 GB. If this is no longer sufficient, you should consider to add another node to the cluster.
The assigned heap should be related to the volume of storage. As a rule of thumb Elasticsearch recommends a ratio of 1:24 between heap and storage size. For example, if you plan a storage size of 240 GB per node, you should consider 5 GB heap for the JVM, respectively 10 GB of RAM on the host machine.
However, the RAM to storage ratio will depend a lot on your use case, query patterns and latency requirements. The ideal ratio will depend on your hardware and your index and query patterns. The only way to really know is to benchmark with realistic data and queries on the actual hardware.
For more information, see Elasticsearch reference guide about heap size.
- Ingest nodes:
nJAMS itself does not use ingest nodes. But, if any third-party tools like monitoring (Kibana) requires ingest nodes, one or more of the Data notes can play this role additionally.
- Master-eligible nodes:
Since it is important for cluster health to have a stable master node, the Master-eligible nodes should be separated from Data nodes and run in their own JVM.
The number of required Master-eligible nodes depends on your demand. At least 1 Master-eligible node is required per cluster. If you give high priority to reliabilty, then it is recommended to use 3 Master-eligible nodes. See Elasticsearch reference guide about avoiding split brain problem.
Master-eligible nodes require less resources than Data nodes. Nevertheless, the Master node controls the cluster state and should be provided with sufficient resources to work stressless. You can start with 2 GB heap and 1 core per Master-eligible node and monitor the load. If the load increases and resources become short, expand resources step by step.
The following formula calculates the Minimum-Master-Nodes:
(master-eligible-nodes / 2) + 1For more information, see Elasticsearch reference guide about different types of nodes.
- Replicas:
Replicas increase reliability and search performance of the cluster by creating copies of data on other nodes.
For example, with having one replica configured, a single data node can have an outage while the cluster remains fully operational. A replica shard is never allocated on the same node as the original/primary shard that it was copied from.
Replicas allow you to scale out your search volume/throughput since searches can be executed on all replicas in parallel.
Replicas also enable the cluster for rolling restarts. Nodes can be restarted for maintenance one after the other, without affecting the cluster.
On the other hand, replicas require additional disk space for storing the copies.
- Scaling:
The cluster should be prepared to scale. If you need more space, you can just add additional Data node(s) to the cluster.
- Manage host list:
When having more than one Elasticsearch node, managing the hosts list in nJAMS’ indexer connection configuration becomes important.
- Sniffing disabled:
When sniffing is disabled nJAMS uses the list of hosts for connecting into the cluster. Once the connection is established, nJAMS uses all hosts in the list for executing requests, i.e., it sends its requests to the nodes in the list in a round-robin fashion. Consequently, the list should contain all data nodes, but must not list master nodes.
- Sniffing enabled:
When sniffing is enabled, the relevance of the hosts list is less important. nJAMS still uses the list for connecting into the cluster. But after that the list is no longer used. Instead the list of nodes for executing requests is build internally from the nodes found in the cluster state. Therefore, it is sufficient to list a single node in the hosts list (no matter whether data or master node), or multiple when using replicas and allowing outage for one or more hosts. Sniffing can only be used if nJAMS is able to connect directly to the data nodes. Otherwise cluster connection will fail.
To manage nodes of the host list login into nJAMS GUI as nJAMS Administrator, enter
Administration > Connections > Indexer, stop Indexer, and add/remove hosts.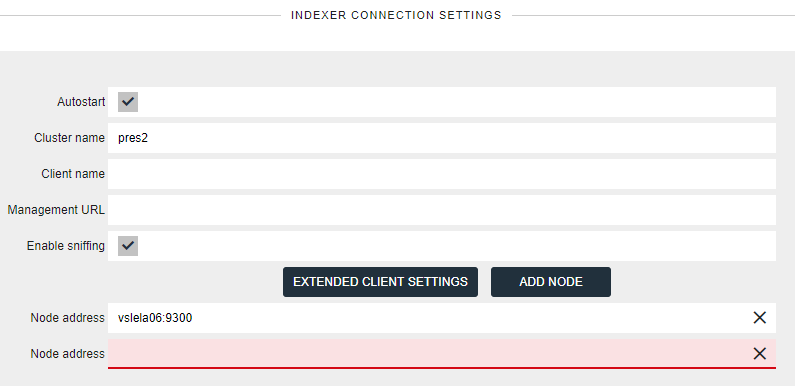
For more information, see Elasticsearch reference guide about sniffing.
Additional considerations:
- Delaying allocation when a node leaves the cluster:
When a node leaves the cluster, Elasticsearch begins to create new replicas and rebalance shards across the remaining nodes which can put a lot of extra load on the cluster. If the missing node is expected to return soon, it might not be necessary to start rebalancing immediately. For example, it probably makes more sense to delay rebalancing for about 5 minutes.
The following option can be used for delaying rebalancing: set
index.unassigned.node_left.delayed_timeoutto5m.See Elasticsearch reference guide for more information about delayed allocation.
- Avoid multiple instances of the same shard on a single host:
If you use multiple nodes on the same host, you should prevent allocation of multiple instances of the same shard on a single host.
To do so, set
cluster.routing.allocation.same_shard.hosttotrue.See Elasticsearch reference guide for more information on this topic.
- Enable shard allocation awareness:
If you want Elasticsearch to consider your physical cluster setup when allocating shards, you can use the shard allocation awareness feature. For example, if your cluster spreads about multiple data centers, you can configure Elasticsearch in a way that prevents it from allocating replicas at the same site as their primaries.
Refer to Elastisearch guide about shard allocation awareness for more information.
Recommendations for Elasticsearch in a nutshell#
- Nodes:
Use dedicated master nodes!
- Networking:
Avoid running Elasticsearch over WAN links between data centers
Not officially supported by Elastic!
Use frequent snaphots for backing up data in remote data center
CCS/CCR is not suitable for nJAMS, it just only costs money
Try to have zero (or few) hops between nodes
If you have multiple network cards:
separate transport and http traffic (transport on faster NIC)
- Disks:
Prefer solid state disks (SSDs)
Local disk is king! In other words, avoid NFS, SMB, AWS EFS, or Azure filesystem
Elasticsearch does not need redundant storage:
replicas = software provided HA
local disks are better than SAN
RAID 1/5/10 is not necessary
If you have multiple disks in the same server you can set RAID 0 or path.data
SSDs:
Use noop or deadline scheduler in the OS ‒ for more detail, see: https://www.elastic.co/guide/en/elasticsearch/guide/current/hardware.html#_disks
Trim your disks periodically: ‒ https://www.elastic.co/blog/is-your-elasticsearch-trimmed
Spinning disks:
are OK for warm nodes only! But don’t forget to disable concurrent merges
- Server Hardware Selection:
In general, choose large machines over x-large machines (e.g., 4-8 CPU, 64GB RAM, 4*1 TB SSD)
Avoid running multiple nodes on one server (also applies to virtualization!)
- RAM:
Some guidelines for configuring the heap size:
set Xms and Xmx to the same size (bootstrap check)
set Xmx to no more than 50% of your physical RAM
do not exceed more than 30 GB of memory (do not exceed the compressed ordinary object pointers limit)
Leave as much memory to the filesystem cache as possible
Disable swapping
Enable SSL/TLS for WildFly#
This article explains how to setup WildFly 16 to run with SSL connections only.
In order to enable SSL/HTTPS, you have to edit standalone.xml at <your-wildfly-home>/standalone/configuration/.
Shutdown WildFly application server, e.g. execute
./<your-njams-home>/bin/stopAll.sh. Make sure WildFly is definitely stopped. If necessary, use kill command to stop WildFly.Modify
standalone.xmlStart WildFly, e.g. execute
./<your-njams-home>/bin/startAll.sh.
With reagrds to modify standalone.xml follow these instructions accordingly:
Recent WildFly versions come with a default SSL configuration which, however, is disabled by nJAMS installer. To reactivate it, find element <https-listener and set property enabled to
true. In addition, https-listener needs an increased value formax-post-sizeas indicated below in order to enable uploads of nJAMS Server update package files.<server name="default-server"> <https-listener name="https" socket-binding="https" enabled="true" max-post-size="209715200" security-realm="ApplicationRealm" enable-http2="true"/> ... </server>
Adapt ApplicationRealm and ManagementRealm
The ApplicationRealm is preset with a default SSL configuration using the application.keystore file located in
<your-wildfly-home>/standalone/configuration/:<security-realm name="ApplicationRealm"> <server-identities> <ssl> <keystore path="application.keystore" relative-to="jboss.server.config.dir" keystore-password="<your-password>" alias="server" key-password="<your-password>" generate-self-signed-certificate-host="localhost"/> </ssl> </server-identities> ... </security-realm>
Change the keystore configuration to use your own keystore file, e.g.
<keystore path="<your-njams-home>/data/<your-keystore>.jks" keystore-password="<your-password>"/>
The ManagementRealm does not have a default SSL configuration. Therefore copy the <server-identities> configuration from ApplicationRealm into ManagementRealm:
<security-realm name="ManagementRealm">
    <server-identities>
        <ssl>
            <keystore path="application.keystore" relative-to="jboss.server.config.dir" keystore-password="<your-keystore-password>" alias="server" key-password="<your-key-password>" generate-self-signed-certificate-host="localhost"/>
        </ssl>
    </server-identities>
    ...
</security-realm>
Configure the management interface to use both http and https protocols.
Note
nJAMS Server internally uses the http protocol for interacting with the WildFly management interface. This communication requires the http protocol but is local only. Therefore, when configuring the management console to use SSL, we always have to allow http access from localhost also.
Find the <management-interfaces> element and add the https socket binding:
<management-interfaces>
    <http-interface security-realm="ManagementRealm">
        <http-upgrade enabled="true"/>
        <socket-binding http="management-http" https="management-https"/>
    </http-interface>
</management-interfaces>
Define bind addresses for managment and public interfaces. Change the bind address of the management interface to localhost (127.0.0.1) and that of the public interface to your host’s public IP address:
<interfaces>
    <interface name="management">
        <inet-address value="127.0.0.1"/>
    </interface>
    <interface name="public">
        <inet-address value="<your-public-ip-address>"/>
    </interface>
</interfaces>
Limit socket binding to the according interfaces. Add the interface property to the socket-bindings as shown in the listing. Leave all other socket-binding entries unchanged:
<socket-binding-group name="standard-sockets" default-interface="public" port-offset="${jboss.socket.binding.port-offset:0}">
    <socket-binding name="management-http" interface="management" port="${jboss.management.http.port:9990}"/>
    <socket-binding name="management-https" interface="public" port="${jboss.management.https.port:9993}"/>
    <socket-binding name="http" interface="management" port="${jboss.http.port:8080}"/>
    <socket-binding name="https" interface="public" port="${jboss.https.port:8443}"/>
    ...
</socket-binding-group>
This step is optional and configures a redirect for http requests from port 8080 to https on port 8443.
Remove the interface property that was added in step 5 only from socket-binding named ‘http’.
<socket-binding-group name="standard-sockets" default-interface="public" port-offset="${jboss.socket.binding.port-offset:0}">
    <socket-binding name="http" port="${jboss.http.port:8080}"/>
    ...
</socket-binding-group>
Add a filter to the undertow subsystem that rewrites http requests to https and sends them to the external IP interface.
<subsystem xmlns="urn:jboss:domain:undertow:8.0" default-server="default-server" default-virtual-host="default-host" default-servlet-container="default" default-security-domain="other" statistics-enabled="${wildfly.undertow.statistics-enabled:${wildfly.statistics-enabled:false}}">
...
    <filters>
        <rewrite name="http-to-https" target="https://<your-ip-address>:8443%U" redirect="true"/>
        ...
    </filters>
...
</subsystem>
Use the filter in the default server configuration by adding a reference to it.
<subsystem xmlns="urn:jboss:domain:undertow:8.0" default-server="default-server" default-virtual-host="default-host" default-servlet-container="default" default-security-            domain="other" statistics-enabled="${wildfly.undertow.statistics-enabled:${wildfly.statistics-enabled:false}}">
    ...
    <server name="default-server">
        <host name="default-host" alias="localhost">
            ...
            <filter-ref name="http-to-https" predicate="equals(%p,8080)"/>
        </host>
    </server>
    ...
    </subsystem>
Maintain internal nJAMS database#
The internal “H2” database of nJAMS Server is a lightweight, efficient and low maintenance relational database management system (RDBMS).
However, from time to time it may be required to maintain nJAMS H2 database file.
Especially when nJAMS Server is running continously over weeks or months, the H2 database file may increase significantly.
nJAMS internal database file njams.mv.db is located at <njams-installation>/data/h2/.
Note
You should keep in view the file size of the H2 database and the available disk space.
Compacting nJAMS H2 database
Compacting nJAMS H2 database releases empty space in the database file. The H2 database is automatically compacted, when closing the database. In order to close and compact H2 database, nJAMS Server must be stopped. It is recommended to compact nJAMS H2 database periodically by performing a stop / start sequence of nJAMS Server as part of a planned downtime.
You can perform a restart of nJAMS Server by selecting Restart at Administration / System control / Deployment.
Compacting just releases unused space and does not run any optimization or reorganisation of the database. To perform a reorganization of the nJAMS database, the database has to be rebuilt.
Rebuilding nJAMS H2 database
Recreating the database reduces the database file size even further. Since recreating also rebuilds the indexes, the overall performance of the nJAMS database increases as well. To rebuild nJAMS database, the database has to be exported first. Secondly, a new database file has to be created from scratch based on the content of the exported database file.
There is an nJAMS database maintenance tool that can rebuild nJAMS H2 database. The tool is available for Linux and Windows and can be downloaded from our public repository njams-toolbox at GitHub.
How to use nJAMS Server with TIBCO EMS using SSL:#
- Connect to a single TIBCO EMS instance with SSL:
This sample configuration uses a single TIBCO EMS Server secured by SSL using certificates provided by TIBCO coming with EMS installation 8.5, see
<EMS_INSTALL>/8.5/samples/certs/. Have a TIBCO EMS Server instance configured using SSL.Using JMS w/o JNDI
Copy certificates to nJAMS Server machine, e.g. into:
/opt/njams/data/certs/emsAdd new JMS connection using SSL, e.g.
Property:
Value:
Name
sslJmsEMS01
JNDI
disabled
Provider URL
ssl://vswtibco01:7242
User/PW
admin/admin
Destination
njams
SSL
enabled
SSL trace
enabled
SSL debug trace
enabled
Trusted certificates
/opt/njams/data/certs/ems/server_root.cert.pem
Expected hostname
server
Add new Data Provider using SSL connection
Property:
Value:
Name
sslDP
Thread count
4
Type
LOG_MESSAGE
JMS Connection
sslJmsEMS01
Startup
LAST STATE
Start Data Provider
- Connect to a fault-tolerant TIBCO EMS instance with SSL:
This sample configuration uses a fault-tolerant TIBCO EMS Server secured by SSL using certificates provided by TIBCO coming with EMS installation 8.5, see
<EMS_INSTALL>/8.5/samples/certs/. Have a TIBCO EMS Server setup running in fault-tolerant mode using SSL.Using JMS with JNDI
Copy certificates to nJAMS Server machine, e.g. into:
/opt/njams/data/certs/emsAdd JNDI connection using SSL
2.1 Login to nJAMS Server instance and go to Administration / Connection
2.2 Add new JNDI connection using SSL, e.g.:
Property:
Value:
Name
sslJndiEMS01
Provider URL
tibjmsnaming://vswtibco01:7242,tibjmsnaming://vswtibco01:7243
User/PW
admin/admin
Initial Context Factory
com.tibco.tibjms.naming.TibjmsInitialContextFactory
2.3 Add connection properties, e.g.:
Key:
Value:
com.tibco.tibjms.naming.security_protocol
ssl
com.tibco.tibjms.naming.ssl_expected_hostname
server
com.tibco.tibjms.naming.ssl_trusted_certs
/opt/njams/data/certs/ems/server_root.cert.pem
com.tibco.tibjms.naming.ssl_verify_host
false
com.tibco.tibjms.naming.ssl_verify_host_name
false
Add new JMS connection using SSL
Property:
Value:
Name
sslJmsEMS01
JNDI
enabled
Connection factory
FTSSLConnectionFactory
JNDI Context
sslJndiEMS01
User/PW
admin/admin
Destination
njams
SSL
enabled
SSL trace
enabled
SSL debug trace
enabled
Trusted certificates
/opt/njams/data/certs/ems/server_root.cert.pem
Expected hostname
server
Add new Data Provider using SSL connection
Property:
Value:
Name
sslFtDP
Thread count
4
Type
LOG_MESSAGE
JMS Connection
sslJmsEMS01
Startup
LAST STATE
Start Data Provider