How to re-index existing indexes#
Note
For technical resons, certain indexes cannot be re-indexed. If such indexes are created with an old version that is no longer supported by a new Elasticsearch version, the only way to handle these indexes for update is deleting them.
Re-indexing is the way of converting old version indexes into the currrent version, i.e., v6 to v7. There is actually no need to do this, until Elasticsearch version 8 or later is supported by nJAMS, that then will no longer be capable of working with v6 indexes.
Re-indexing is very time and resources consuming, and you should evaluate whehter or not you need to do it.
Note
If you need to re-index Elasticsearch 5 indexes for updating to nJAMS Server 5.1, you need to do this with nJAMS Server 4.4 or 5.0. Please see the according documentation for details.
The following instructions describe re-indexation from v6 to v7.
- Starting situation after upgrading your Elasticsearch Cluster from 6 to 7 and upgraded nJAMS Server to 5.1:
When upgrade is done and nJAMS Server is started again, you can enter the “Index Management” page to see the current state of your indexes of your Elasticsearch Cluster. Go to
Administration > Connections > Indexer > Tab Index Management: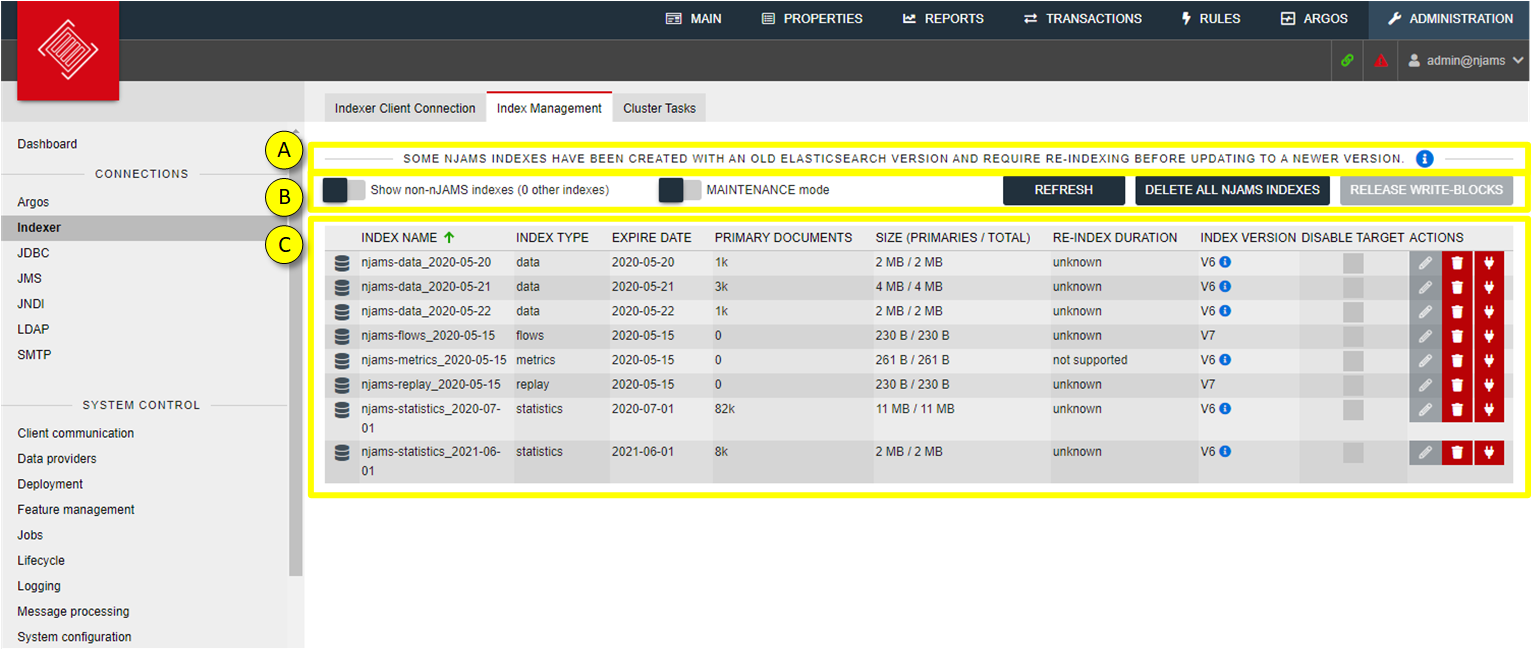
- A:
Index state let you know, whether there are indexes left of previous version in your Elasticsearch
- B:
REFRESH updates the current page to see the last changes to the indexes
Show non-nJAMS indexes also show indexes that do not belong to nJAMS Server
MAINTENANCE Mode enables you to re-index the indexes. As soon as you activate the Maintenance Mode, Indexer and Data Providers will stop. That means, when you are in Maintenance Mode, message processing is off, as well as searching for monitoring data, etc.
DELETE all nJAMS indices removes all indexes related to nJAMS. Be careful, when you confirm the following confirmation prompt, all data will be lost. Please note, once all indexes have been removed, nJAMS Server will immediately start creating new indexes again.
- C:
This is the list of indexes of your Elasticsearch Cluster used by nJAMS:
Name is the name of the index
Type indicates the index type, respectively the usage of the index
Expiration indicates the date, when the index will expire
Primary documents indicates the number of documents, which are relevant for re-indexing
Size indicates the size of the index
Estimated re-index duration is a rough estimation about how long a re-indexing of an index may take. Initially the estimated time is “unknown”. As soon as you re-indexed the first index, nJAMS Server can estimate roughly the time for the other indexes of the same type.
Index version is the version of the index format, respectively the Elasticsearch version with that this index was created.
Disable target indicates the index is disabled as indexing target. This happens, when multiple indexes for the same type and same expiration date exist, for example when re-indexing an index and chosing to keep the source index also. Then the v6 source index will remain as disabled target. .. caution:: Changing this option is not recommended unless you are absolutely sure that the result will not end in inconsistent state.
Actions let you re-index or remove the selected index. Both actions are only available, when Maintenance Mode is active. Re-indexing is only available in maintenance mode and for supported index types. You can only delete nJAMS related indexes and the outdated “.scripts” index. The detach button removes the according index from being used by nJAMS Server. The index is then ignored like any other 3rd party index in the cluster.
- Procedure for re-indexing:
Enter
Administration > Connections > Indexer > Tab Index ManagementActivate Maintenance Mode
Select the index you want to get re-indexed
Click on the pen icon in column Actions, the following dialog opens:
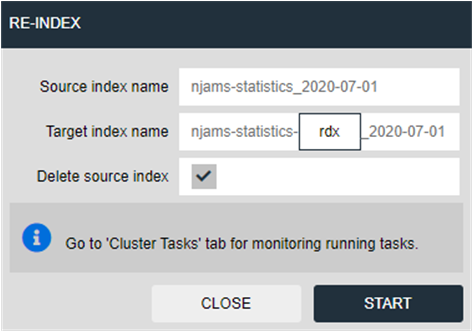
Source index name: name of the selected source index
Target index name: new name for the re-indexed index. In most cases there is no need to change the proposed name.
Delete source index: when this option is enabled, the source index will be removed, if re-indexing was successful. When you disable this option, the source index will remain but will be disabled as indexing target. Please note: if there are both indexes (source and target index) available, you will get duplicate results in nJAMS GUI. It is recommended to remove the source indexes immediately after re-indexing, so just leave this option enabled. Alternatively, you may eventually detach the source index from nJAMS Server.
Start re-indexing
By starting re-indexing, a cluster task is created. You can switch to tab Cluster Tasks to follow each task. Depending on type and size of the index and the performance of your Elasticsearch cluster, re-indexing may take a while. You can cancel and remove a cluster task at any time.

When re-indexing was successful, you can see the result here:
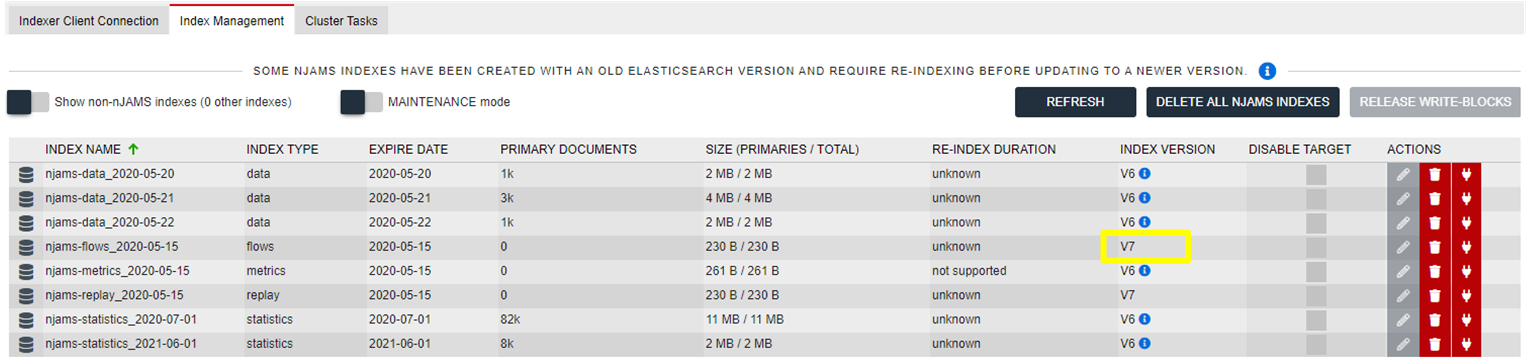
There is now a new index in format v7 and the previous index has been removed.
Continue re-indexing with the next index.
At the end you have an entirely re-indexed Elasticsearch cluster, where all indexes are in v7:

Caution
Though possible, you should be very careful with running multiple re-indexing tasks at the same time, since re-indexing requires much resources in the Elasticsearch cluster. That also means, during re-indexing, the Elasticsearch cluster may become stressed.