Indexer#
The Indexer component is responsible for communication with Elasticsearch. There are mainly two tasks that are performed by the Indexer component:
Storing log messages into Elasticsearch and indexing log messages for fast retrieval.
Retrieving data from Elasticsearch and providing to nJAMS GUI.
The Indexer page allows nJAMS Administrators to assign an Elasticsearch cluster to nJAMS Server and to start / stop the Indexer component. The following chapters explain how to configure and maintain the Indexer.
- Configuration:
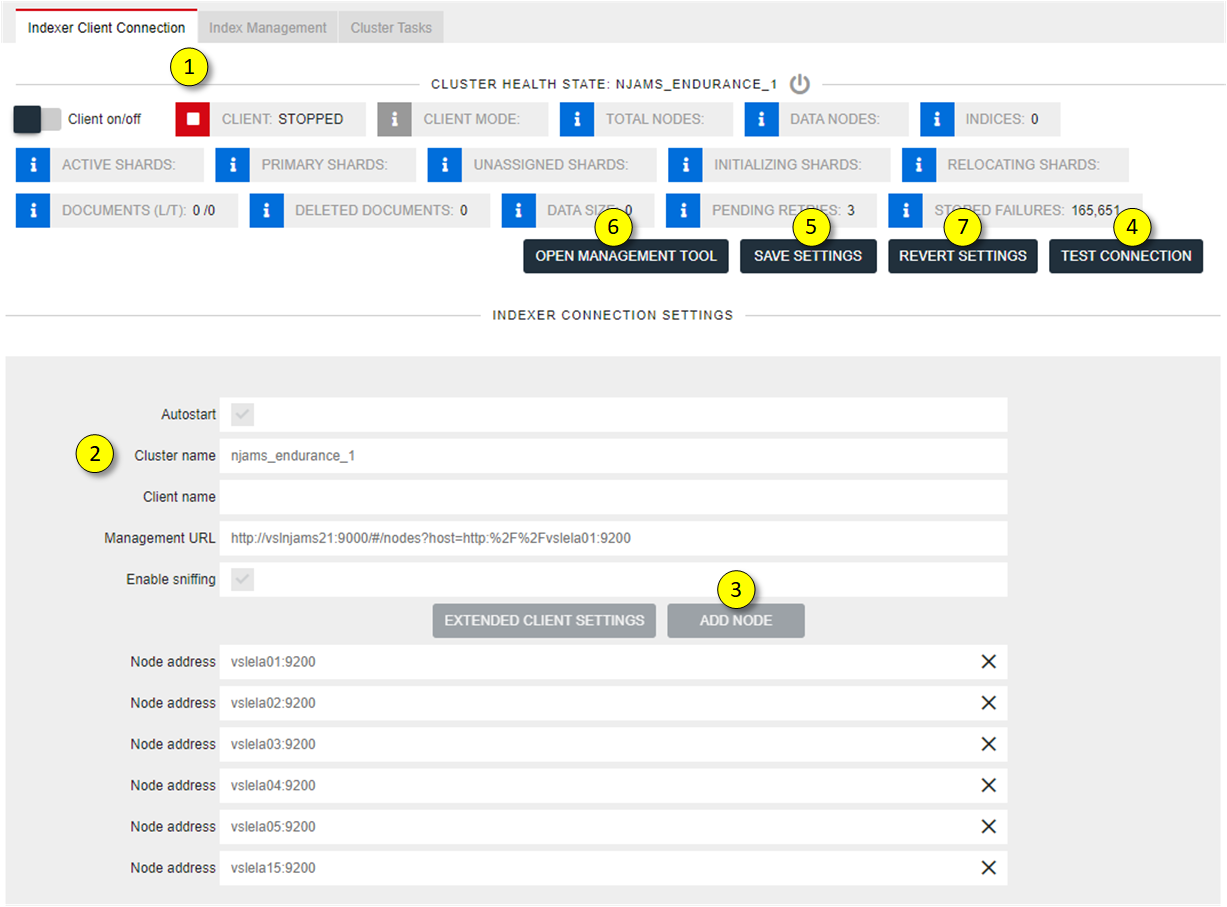
This is the Indexer configuration and administration page:
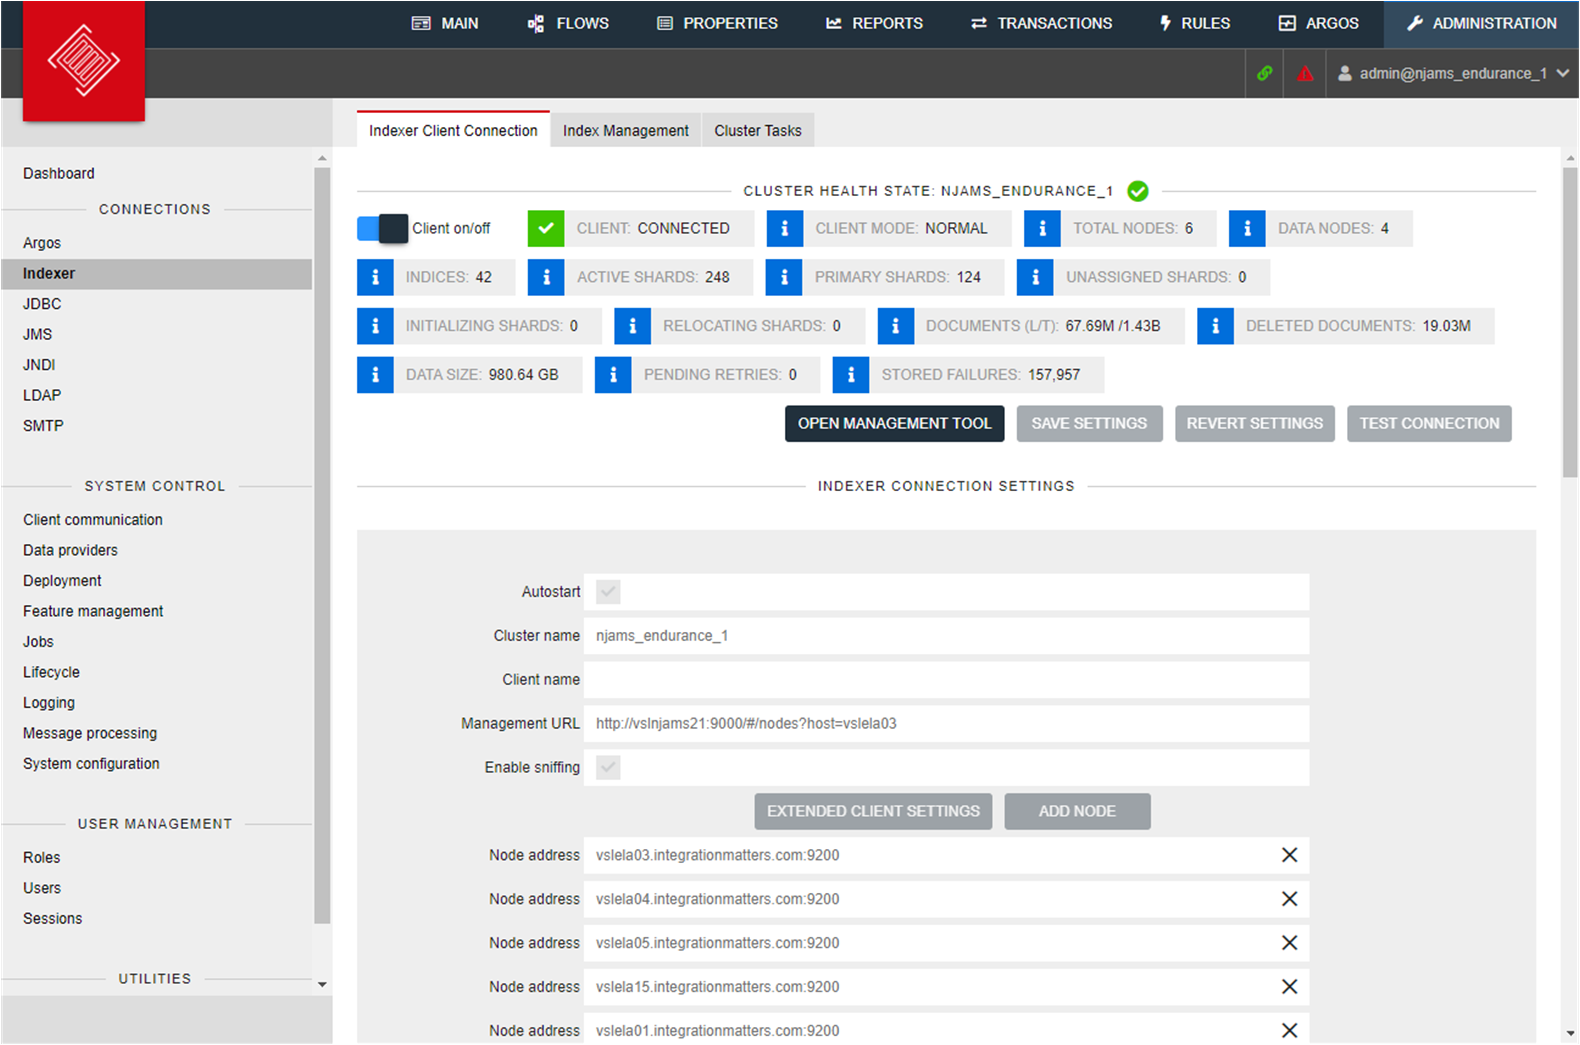
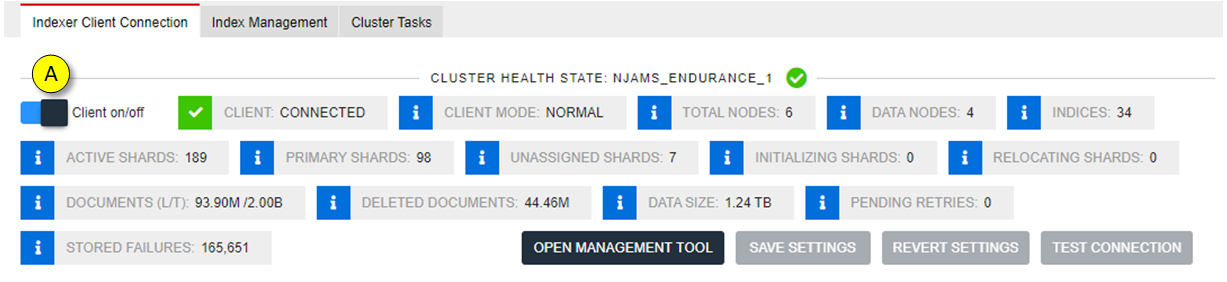
The following indicators of the Elasticsearch cluster state are provided:
Setting
Description
Cluster Health State
State of the Elasticsearch cluster can be:
green: cluster is operational
yellow: cluster is disturbed, but operational without data loss
red: cluster is inoperable, Message Processing is stopped
Client On/Off
Turns Indexer Client on or off. It is required to stop the Client before its configuration can be modified. And it is also necessary to Stop the Client for maintenance work at the Elasticsearch cluster, e.g. creating snapshots from cluster, etc.
Note
When you stop the Indexer, be aware that Message Processing is stopped as well as searching and data retrieval in nJAMS GUI.
Client Status
Status of Indexer Client (Indexer): CONNECTED: Client is fully connected and working WRITE-BLOCKED: Client is in read-only mode and does not write log messages into Elasticsearch STOPPING: Client is about to shut down connection to Elasticsearch cluster STOPPED: Client is stopped. There is no connection to Elasticsearch.
Client Mode
Indicates whether the Indexer Client is used with any restrictions.
Total Nodes
Number of total nodes of Elasticsearch cluster
Data Nodes
Number of total Data nodes of Elasticsearch cluster
Indices
Total number of Indexes
Active Shards
Number of Active Shards
Primary Shards
Number of Primary Shards
Unassigned Shards
Number of Unassigned Shards
Initializing Shards
Number of Initializing Shards
Relocating Shards
Number of Relocating Shards
Documents (L/T)
Number of documents: L: Number of documents followed from log messages represents the number of log entries in nJAMS Server. T: Total number of documents, includes all kind of data.
Deleted Documents
Number of documents that have been deleted according to data maintenance settings
Data Size
This is the actual size of the Cluster storage
Pending Retries
Total numbver of requests pending for rescheduling
Stored Failures
Total number of failed requests stored in database
The connection parameters of the Indexer component are as follows:

Setting
Description
Autostart
Enables Autostart option of Indexer component during start of nJAMS Server application
Cluster name
Name of the Elasticsearch cluster
Client name
Optional: Client node name that represents nJAMS Server by name in Elastichsearch Cluster
Management URL
Optional: URL to an Elasticsearch Management Tool, e.g. ‘Kopf’. This URL will be used when you click on ‘OPEN Management Tool’.
Enable sniffing
By default, nJAMS 4 configures the transport client to use its internal sniffing feature. This feature allows the transport client to automatically detect all data nodes in the cluster.
It works as follows: The manually configured node address(es) is used for inital connection into the cluster only. When connected, the client resolves all data-node addresses (only) from the cluster and replaces the manually configured node address(es) with this resolved address list. Note that this resolved list does not necessarily contain the nodes configured manually!
The internal nodes list is automatically refreshed in regular intervals (default is 5 seconds). The client then directs all requests directly to the data nodes that are responsible for serving a certain request. The client does not direct any requests to the master or client nodes. As a result, when using sniffing, there is no use for client nodes.
Disabling Sniffing: Prior to nJAMS 4.1 sniffing can only be disabled by a system property: njams.indexer.sniffDisabled=true Since nJAMS 4.1 sniffing can be disabled both using the installer and the indexing configuration page in nJAMS UI. When sniffing is disabled, the transport client communicates only with the manually configured nodes in a round robin fashion, though most action will probably be two-hop operations.
By default, sniffing is enabled.
Please note: If you want to use sniffing in combination with SSL encryption, all nodes have to be configured to publish with an address that matches the address in the SSL certificate. Use
network.publish_host: <full-DNS-name>inelasticsearch.ymlof each node.Add Node
Add nodes of your Elasticsearch cluster, depending on configuration of sniffing. Enter nanme or IP address of an Elasticsearch node followed by port, e.g. elastic01:9200.
Extended Client Settings
Open the extended client settings dialog.
Use X-Pack Features:

Setting
Description
Use client
Enable/disable client authentication If enabled, enter username and password.
authentication
This features can only be used in connection with Use SSL/TLS.
Use SSL/TLS
disabled: does not use encryption
encryption
default system keystore: uses the default Java keystore custom keystore: enter your own keystore certificate file: full path to certificate file
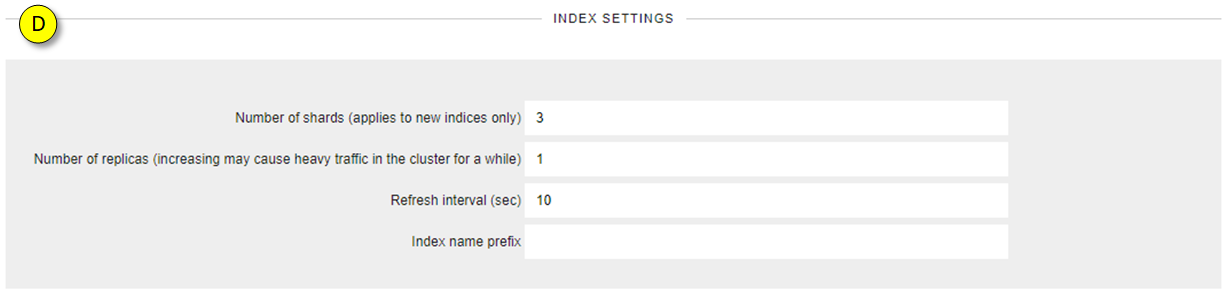
Indexing settings can be adjusted after you have to Stop Client:
Setting
Description
Number of Shards
Number of Shards for new Indexes
Number of Replicas
Total number of Replica Shards with regards to all indexes. Please note: changing number of Replica Shards may cause a lot of traffic. Depending on your data volume it may take some time. Excursion: The main purpose of Replicas is for failover. If the node holding a primary shard is not working, a replica is promoted to the role of primary.
Refresh interval
Enter refresh interval in seconds
Index name prefix
Enter prefix for index naming
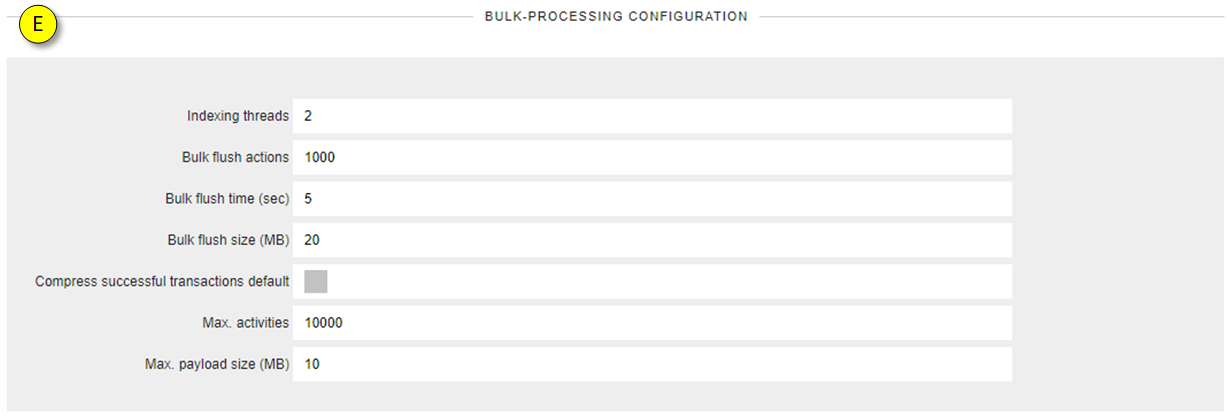
The bulk processing can be configured with regards to the following settings:
Setting
Description
Indexing Threads
Number of threads indexing documents
Bulk flush
Maximum number of actions, before triggering a flush. Default: 1000.
actions
Bulk flush time
Maximum number of seconds to wait, before triggering a flush. Default: 5.
(secs)
Bulk flush size
Maximum size of JSON request body, before triggering a flush. Default: 20 MB.
(MB)
Compress
Discard transitions of successful process executions. Default: enabled.
successful
Leave this option to enabled, if you want to save storage.
transactions
Disable this option, if you want to analyze the process execution path.
Max activities
Maximum number of activities of a single process instance.
Max payload
Maximum size of payloads in [MB].
Note
Do only change these values in (D) and (E) on advise of Integration Matters Support or if you are substantially familiar with Elasticsearch.
Search settings:
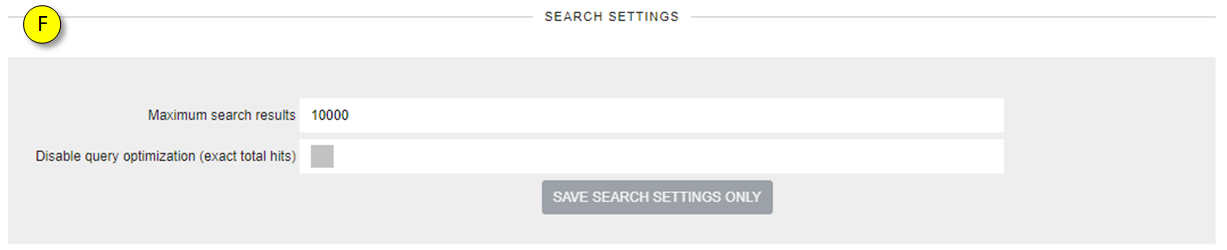
Setting
Description
Maximum search
Reduce number of search results in order to speed up queries to use the resources of the
results
Elasticsearch cluster more efficiently
Disable query
Disable query optimization, if you want to retrieve the exact number of results
optimization
- Add an Elasticsearch node:
In case you installed a blank nJAMS Server without any other options, the Indexer Client is not configured. An nJAMS Administrator has to create a connection to the Elasticsearch cluster. In order to create a connection for the Indexer Client it is required to have an Elasticsearch cluster in place. If nJAMS Server discovers an Elasticsearch cluster, the Indexer Client will create the nJAMS structure (mapping, etc.) within the cluster automatically.
Note
In case you want to use an already installed Elasticsearch Cluster (not installed by the nJAMS installer), scripting has to be enabled. Login to your Elasticsearch Node(s) machine(s) and edit
<ES_HOME>/config/elasticsearch.yml. The following entries have to be included, respectively changed: script.indexed: on, script.inline: on.An Elasticsearch cluster is assigned by entering the Elasticsearch Cluster Name and at least one Node Address. These values are mandatory to create a valid connection to an Elasticsearch cluster.
Note
An Elasticsearch cluster may consist of only 1 Node, but it is still called a cluster.
Make sure the Indexer Client is stopped.
Enter the cluster name and the hostname or IP Address of at least one Node of the Elasticsearch cluster. Client name and Management URL are optional. The Management URL contains a link to an external management tool for Elasticsearch, which is installed separately. There are several 3rd party tools available. In this example ‘Kopf’ is used.
If applicable, add further Node addresses
Make sure a connection can be established to the Elasticsearch cluster by testing the connection
Save the Indexer Client configuration, once it is tested properly
If the Management URL was provided, click on ‘OPEN Management Tool’ to get a deeper look inside of the Elasticsearch cluster. If you have installed ‘Cerebro’, for example, you are directed to the page of Cerebro, which provides you a detailed view into your Elasticsearch cluster
Revert current settings to previous settings.
You are now ready to start the Indexer Client!
- Start Indexer Client:
Start the Indexer Client for nJAMS Server to work with Elasticsearch.

- Index Management:
Index Management allows you to manage the indexes of your Elasticsearch Cluster. The main use case for Index Management is re-indexing existing nJAMS indexes into a new format. The following chapter describes why it is potentially required to re-index indexes and how to re-index an index.
How to re-index existing indexes:
Re-indexing is required, if you want to be able to search for event data of the past like payload, stacktrace, activity duration, etc. If you just want to search for process executions, filtered by time or domain object, re-indexing is not required.
In contrast, if you come from Elasticsearch 2, you have to re-index the indexes from v2 to v5 before you can migrate to Elasticsearch 6. In this scenario re-indexing is required! The following instructions describe re-indexation from v5 to v6 as a sample for re-indexation from v2 to v4.
Initial situation after upgrading your Elasticsearch Cluster from 6 to 7 and upgraded nJAMS Server to 5.1:
When the upgrade is done and nJAMS Server is started again, you can enter the “Index Management” page to see the current state of your indexes of your Elasticsearch Cluster. Go to
Administration > Connections > Indexer > Tab Index Management: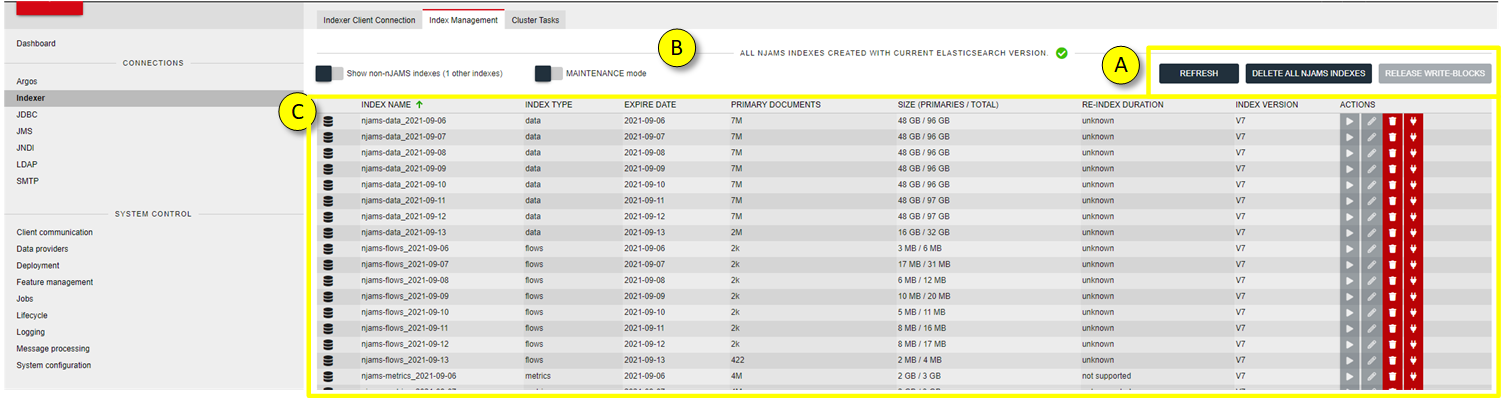
REFRESH updates the current page to see the last changes to the indexes.
HIDE non-nJAMS indexes only show indexes used by nJAMS.
MAINTENANCE Mode enables you to re-index the indexes. As soon as you activate the Maintenance Mode, Indexer and Data Providers will stop. That means, when you are in Maintenance Mode, message processing is off, as well as searching for monitoring data.
DELETE all nJAMS indices removes all indexes related to nJAMS. Be careful, when you confirm the following confirmation prompt, all data will be lost. Please note, once all indexes have been removed, nJAMS Server will immediately start creating new indexes again.
RELEASE WRITE-BLOCKS makes the index and index metadata writable.
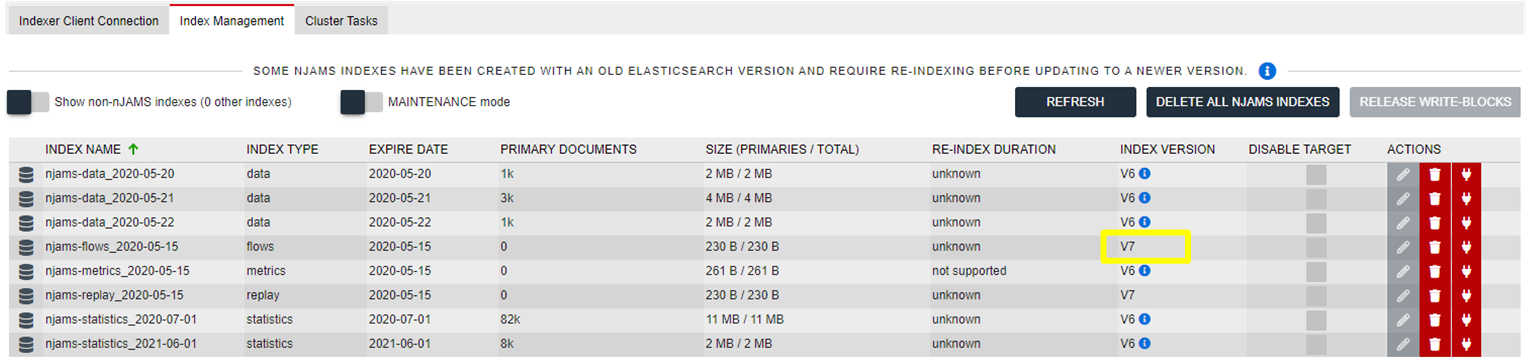
Index state let you know, whether there are indexes left of previous version in your Elasticsearch
This is the list of indexes of your Elasticsearch Cluster used by nJAMS:
Name is the name of the index
Type indicates the index type, respectively the usage of the index
Expiration indicates the date, when the index will expire
Primary documents indicates the number of documents, which are relevant to re-indexing
Size indicates the size of the index
Estimated re-index duration is a rough estimation about how long a re-indexing of an index may take. Initially the estimated time is “unknown”. As soon as you re-indexed the first index, nJAMS Server can estimate roughly the time of the other indexes. Please note, re-indexing a data index is much more time consuming than re-indexing a statistics index, not only because of the amount of data, but because of the structure of the index. Since the duration will be estimated according to the index(es) you indexed, the estimated duration may lead to misleading results, depending on index type. For example, you indexed a data index first. Afterwards the remaining indexes are estimated according to that baseline. This approach results in overestimating the duration for re-indexing of statistic indexes, i.e. re-indexing the statistic indexes will be quicker than estimated. On the other hand, when you re-index a statistic index first, the duration of data indexes will be underestimated, i.e. re-indexing the data indexes will take more time than estimated. To be on the safe side, we recommend to re-index a data index first.
Index version is the version of the index format
Read only indicates the index is read only, no data can be inserted or updated in that index. When re-indexing a v5 index, a new index in format v6 is created. The source index in v5 will remain in read-only state.
Actions let you re-index, remove, or detach the selected index. These actions are only available, when Maintenance Mode is active. Re-indexing is only available for supported index types. You can only delete nJAMS related indexes and “.scripts” indexes.
Procedure for re-indexing:
Enter
Administration > Connections > Indexer > Tab Index ManagementActivate Maintenance Mode
Select the index you want to get re-indexed
Click on the pen icon in column Actions, the following dialog opens:

Source index name: name of the source index
Target index name: new name for the re-indexed index. In most cases there is no need to change the proposed name.
Delete source index: when this option is enabled, the source index will be removed, if re-indexing was successful. When you disable this option, the source index will remain in state read-only. Please note: if there are both indexes (source and target index) available, you will get duplicate results in nJAMS GUI. It is recommended to remove the source indexes immediately after re-indexing, so just leave this option enabled.
Estimated duration: estimated period of time for re-indexing
Remaining duration: time left
Documents processed: number of document that have been processed during re-indexing
Task-Id: this is the Id of the task in Elasticsearch.
Result: expected to be successful, of course.
Start re-indexing
When re-indexing was successful, you can see the result here:
There is now a new index in format v6 and the previous index has been removed.
Continue re-indexing with the next index.